The Puma Scan Professional Edition has many editions and configuration options that allow development teams to perform source code scans from Visual Studio, automated command line tasks, and build pipelines. Optimal performance and accuracy for an application is achieved by configuring the rules, editing tainted sources, and adding cleanse methods. The User Guide shows how to use and configure Puma Scan after completing the Installation Guide.
The following configuration features are available in the profession version only. Community edition users should visit the GitHub Repository to view, fork, and customize the source code directly.
Puma Scan Professional allows custom configuration for all editions. The settings configuration allows users to configure the default scanner settings, rule options, custom tainted sources, custom cleanse methods, and suppress false positives.
Teams can start by customizing the global settings with the End User Edition. Global configuration options are located in the Settings.json file in the PumaSecurity roaming application data directory. We recommend storing customized global settings files in a secure backup location, such as a version control repository to ensure the global scanner configuration history is properly tracked.
On first analysis, the End User Edition creates an application-specific settings file (.pumafile) in the code repository with the defaults defined by the global configuration file. The .pumafile lives in the source control repository to enable historical tracking of all changes to the file. The .pumafile should be placed in the same directory as the solution file (.sln) being analyzed or in the root of the source control repository.
The Server and Azure DevOps Editions leverage the .pumafile stored in source control, along with the application source code, to configure Puma Scan in the build pipeline.
The following sections show the location of the settings files (Settings.json and .pumafile) and describe the schema in detail for development and security teams to customize Puma Scan.
The End User Edition creates the global machine Settings.json file with the default settings during the analysis of the first solution. To generate this file:
The Server Edition’s installer creates the global machine Settings.json file during the installation. After completing the installation wizard, open Windows explorer and browse to the file location shown in Figure 1.
The Azure DevOps Edition is installed and executed on an ephemeral cloud hosted agent. No global machine Settings.json file exists. See the Azure DevOps User Guide for details on passing the path to the application-specific .pumafile to the Puma Scan build task.
Engineers can also view and download a sample default settings file to get started.
Figure 1: The End User and Server Edition’s global machine Settings.json file can be found in the following directory.
%appdata%\PumaSecurity\PumaScan
On first analysis, individual applications will have the default global settings copied to a new .pumafile in the source control repository. The .pumafile should be committed to source control to ensure the Puma Scan configuration is consistent between between developer workstations, on-premise build servers, and Azure DevOps pipelines.
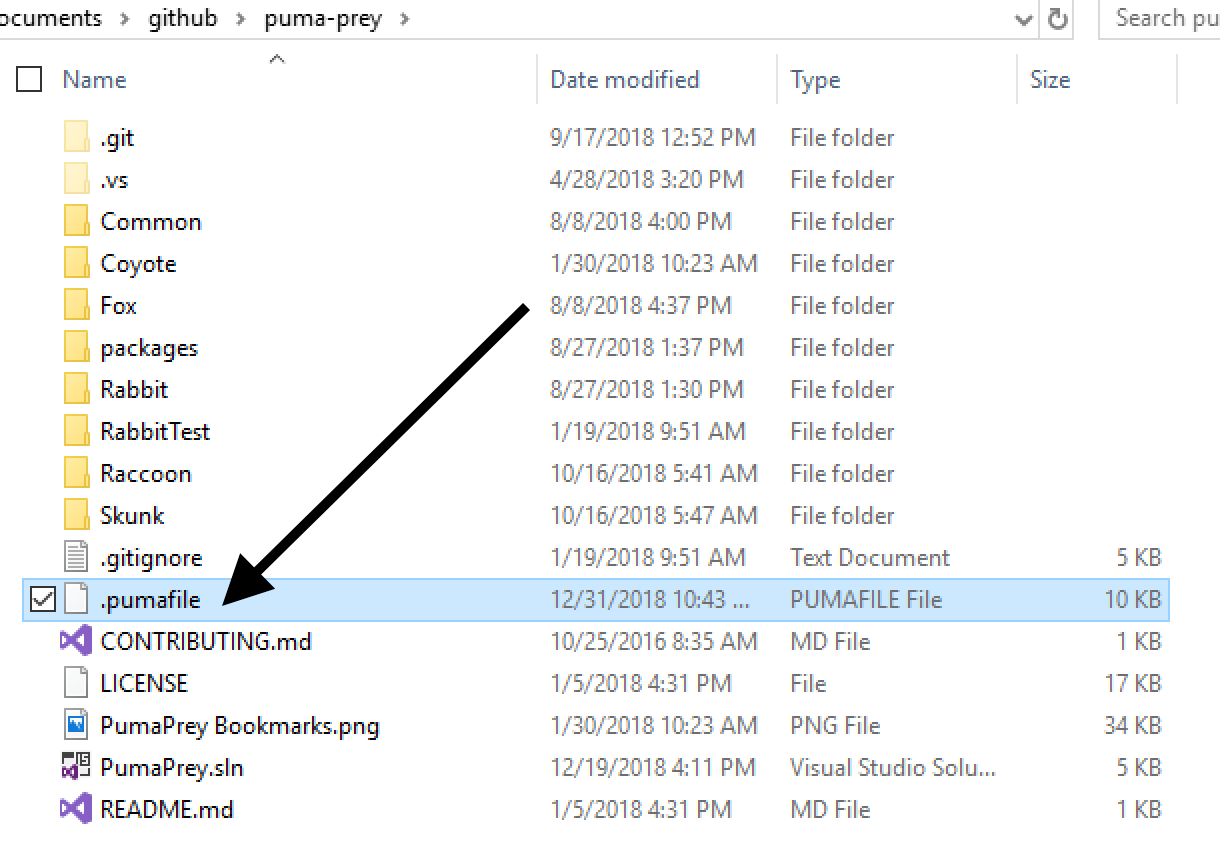
The .pumafile can be stored in the root of the source control repository or same directory as the solution file (.sln) being analyzed (if different). Figure 2 shows Puma Prey repository’s local .pumafile stored in the root.
Figure 2: The following screenshot shows the Puma Prey repository with a .pumafile in the root directory.
The GeneralSettings section of the settings file contains global options that affect how the scanner works. Puma Scan supports the following general configuration options:
Puma Scan Professional performs data flow analysis in many analyzers to determine if the source of an input comes from an untrusted source (e.g. request parameter, web service API, etc.). This setting turns the data flow feature on (true) or off (false). If you are experiencing performance issues with Puma Scan, disabling this feature will improve performance. However, more false positives will occur. The default value is true.
Puma Scan Professional performs data flow analysis in many analyzers to determine if the source of an input comes from an untrusted source (e.g. request parameter, web service API, etc.). In some cases, the data flow analyzer may be unable to perform a complete trace and cannot confidently determine if a vulnerability exists. These sinks are marked as indeterminate. This setting tells the scanner if indeterminate issues should be reported in the scan results (true) or be suppressed by the scanner (false). The default is false.
Puma Scan Professional performs data flow analysis in many analyzers to determine if the source of an input comes from an untrusted source (e.g. request parameter, web service API, etc.). The DataflowAnalysisNodeMaxDepth setting controls how deep into a call tree the analyzer will go until marking an item as indeterminate. Changing this value has a direct impact on the scanner’s accuracy and time to complete a scan. The higher the value, the longer the scan will take with more accurate results. The lower the value, the faster the scan will be with less accurate results. The default value is 9.
Puma Scan Professional will perform a web.config transformation prior to running configuration analysis if a transform file exists. This setting tells the analyzer which configuration transform file you would like to use for analysis. For example, if your configuration transform is called “Web.Production.config”, then you should change this setting to “Production”. The default value is “Release”, which tells the analyzers to look for a file called “Web.Release.config”.
Puma Scan writes log events to the %localappdata%\PumaSecurity\PumaScan directory on the local machine.
The LogLevel value controls the level of detail written to the log file. The default value is Error.
The following JSON block shows the log level and general setting options:
"GeneralSettings": {
    "DataflowAnalysisEnabled": true,
    "DataflowAnalysisReportIndeterminates": false,
    "DataflowAnalysisNodeMaxDepth": 9,
    "ProductionConfigurationTransform": "Release"
},
"LogLevel": "None"
Each analysis rule (e.g. SEC0001) is configurable in the RuleOptions list. All analysis rules have the following options:
Read only field that describes the rule identifer the attributes will affect.
Read only field that describes the rule name the attributes will affect.
Sets a risk rating for the rule. The risk rating is displayed in the detailed diagnostic message and used in downstream Puma Scan reports. Options include High, Medium, or Low. The default risk rating is determined per rule by Puma Security application security engineers.
Sets the build severity for the rule. This setting allows diagnostics to be raised as diagnostics in the Error List Window as an Error, Warning, or Info item. It is important to realize that using the “Error” option will cause the build to break.
Valid options include Error, Warning, or Info. The default severity for all rules in Warning.
Turns an analysis rule on (true) or off (false). The default is true.
The following example shows the default configuration options that exist for all rules.
"RuleOptions": [
    {
      "Id": "SEC0001",
      "Name": "Debug Build Enabled",
      "RiskRating": "Low",
      "Severity": "Warning",
      "Enabled": true
    },
    ...
]
SEC0007 has an additional option allowing users to configure their forms authentication timeout policy.
Defines the maximum forms authentication timeout value (in minutes). The default value is 30.
The following example shows the SEC0007 TimeoutMax option for configuration a custom timeout.
{
  "Id": "SEC0007",
  "Name": "Forms Authentication Weak Timeout",
  "RiskRating": "Low",
  "Severity": "Warning",
  "Enabled": true,
  "TimeoutMax": 30
},
SEC0017 has additional options allowing users to configure a custom password policy.
Defines the minimum number of characters to require for the password length. The default value is 10.
Indicates if the password complexity should require a numeric character. The default value is true.
Indicates if the password complexity should require a lower case character. The default value is true.
Indicates if the password complexity should require an upper case character. The default value is true.
Indicates if the password complexity should require a special character. The default value is true.
The following example shows the SEC0017 password configuration options.
{
  "Id": "SEC0017",
  "Name": "Weak Password Complexity",
  "RiskRating": "Medium",
  "Severity": "Warning",
  "Enabled": true,
  "Length": 10,
  "RequireNumber": true,
  "RequireLowerCase": true,
  "RequireUpperCase": true,
  "RequireSpecialCharacter": true
},
SEC0019 supports registering Cleanse Methods with custom anti-forgery filters or attributes to help suppress false positives.
The following example shows the .pumafile with a custom cleanse method suppressing all anti-forgery findings decorated with the Puma.Security.Validation.Filters.CustomAntiForgeryAttribute class.
"CustomCleanseMethods": [
  {
    "RuleIds": [ "SEC0019" ],
    "Flag": "Filter",
    "Syntax": "AttributeSyntax",
    "Namespace": "Puma.Security.Validation.Filters",
    "Type": "CustomAntiForgeryAttribute"
  }
]
SEC0020 has an additional option allowing users to configure their session state timeout policy.
Defines the maximum session state timeout value (in minutes). The default value is 30.
The following example shows the SEC0020 timeout configuration option.
{
  "Id": "SEC0020",
  "Name": "Weak Session Timeout",
  "RiskRating": "Low",
  "Severity": "Warning",
  "Enabled": true,
  "TimeoutMax": 30
},
SEC0104 supports registering Custom Sinks to help identify Cross-Site Scripting false negatives.
The following example shows the .pumafile with a custom sink raising an issue when the Telerik.Web.UI.RadLabel.Text property is set with tainted data:
"CustomSinks": [
  {
    "RuleIds": [ "SEC0104" ],
    "Flag": "Database",
    "Syntax": "MemberAccessExpressionSyntax",
    "Namespace": "Telerik.Web.UI",
    "Type": "RadLabel",
    "Property": "Text",
    "Method": "set"
  }
]
SEC0107 supports registering Custom Sinks to help identify SQL Injection false negatives.
The following example shows the .pumafile with a custom sink raising SQL Injection issues in the IBM.Data.DB2.DB2Command class. The custom sink raises an issue when the IBM.Data.DB2.DB2Command object creation expression (i.e. constructor) is invoked with tainted data in the first argument.
"CustomSinks": [
  {
    "RuleIds": [ "SEC0107" ],
    "Flag": "Database",
    "Syntax": "ObjectCreationExpressionSyntax",
    "Namespace": "IBM.Data.DB2",
    "Type": "DB2Command",
    "Arguments": [
      0
    ]
  }
]
SEC0120 supports registering Cleanse Methods with custom authorization filters or attributes to help suppress false positives.
The following example shows the .pumafile with a custom cleanse method suppressing all authorization findings decorated with the Puma.Security.Authorization.Filters.CustomAuthorizationAttribute class.
"CustomCleanseMethods": [
  {
    "RuleIds": [ "SEC0120" ],
    "Flag": "Filter",
    "Syntax": "AttributeSyntax",
    "Namespace": "Puma.Security.Authorization.Filters",
    "Type": "CustomAuthorizationAttribute"
  }
]
SEC0131 has an additional option allowing users to configure their own regular expression patterns for variables names containing secrets.
An array of regular expressions containing variable names containing hard-coded secrets. The default list searches for variable names with “Key”, “IV”, and “Password”.
The following example shows the SEC0131 pattens option.
{
  "Id": "SEC0131",
  "Name": "Hard-coded Secret",
  "RiskRating": "High",
  "Severity": "Warning",
  "Enabled": true,
  "Patterns": [
    "^[Kk][Ee][Yy]$",
    "^[Ii][Vv]$",
    "^[Pp][Aa][Ss][Ss][Ww][Oo][Rr][Dd]$"
  ]
}
Security analysts and engineers can suppress false positives in the Exceptions list. To support flexibility and allow security teams to closely audit exception entries, a number of options are available:
The RuleIds array limits the exception to specific rule ids. The bottom example on the right shows how to limit the exception to rule id SEC0032. The default value is an empty array (e.g. []), which means the exception will apply to all diagnostic rules.
Relative path to the file containing the code to ignore. Wildcards (*) and single character matches (?) are supported. This field is required. Valid examples include:
Starting line number in the file that contains the code to ignore. Wildcard (*) is supported. The default is wildcard (*).
End line number in the file that contains the code to ignore. Wildcard (*) is supported. The default is wildcard (*).
Instances with a line of code matching the regular expression pattern are suppressed from the scan results.
Timestamp indicating when the exception expires. Expired instances will start appearing in the scan results again.
SHA256 checksum (hex encoded) of the line(s) of code to ignore. Setting this value creates a valid exception based on the current code. If the line of code changes, the exception is no longer valid and the checksum must be recalculated after reviewing the code changes. This field is optional and defaults to empty.
The checksum property is experimental at this time. Generating the checksum is currently a manual process. We recommend using CyberChef to generate the SHA256 checksum value.
Username of the lead engineer or security analyst approving the exception. This field is optional and defaults to empty.
Justification from the lead engineer or security analyst for approving the exception. This field is optional and defaults to empty.
Timestamp the lead engineer or security analyst approves the exception. JSON formated timestamps are required. This field is optional and defaults to empty.
The following example shows an exception that suppresses all Puma Scan warnings raised from all files (*) in the test directory.
"Exceptions": [
    {
       "Path": "test\\*",
       "ApprovedBy": "Eric Johnson",
       "Reason": "Test directory is not deployed to live environments.",
       "Timestamp": "2018-10-25T22:27:58.6444584Z"
    }
]
The following example shows an exception that suppresses SEC0102 diagnostics raised in .cshtml files if the pattern matches ^@?Html\.Raw\([Mm]odel.*\)$. Exceptions matching the pattern expire on Jan 1st 2019.
"Exceptions": [
    {
        "RuleIds": [
            "SEC0032"
        ],
        "Path": "src\\web\\*.cshtml",
        "Pattern": "^@?Html\\.Raw\\([Mm]odel.*\\)$",
        "Expires": "2019-01-01T00:00:00.0000000Z"
        "ApprovedBy": "Eric Johnson",
        "Reason": "Requirement to fix XSS by end of 2018",
        "Timestamp": "2018-10-25T22:27:58.6444584Z"
    }
]
The following example shows an exception that suppresses SEC0032 diagnostics raised in the AuthenticationController class on line 14 if the checksum of the line matches a specific value.
"Exceptions": [
    {
        "RuleIds": [
            "SEC0032"
        ],
        "Path": "src\\api\\Authentication\\AuthenticationController.cs",
        "StartLine": "14",
        "EndLine": "14",
        "Checksum": "9bf1d66c0e0764bb2179efc0a8f085de99200b441f2ace2a7ba8b78e113ba491",
        "ApprovedBy": "Eric Johnson",
        "Reason": "Request parameter is passed through strict validation routines before being passed to the process start argument.",
        "Timestamp": "2018-10-25T22:27:58.6444584Z"
    }
]
The ExperimentalSettings section of the settings file contains global options that affect which experimental features are enabled or disable. We encourage users to provide feedback on the effectiveness of these experimental rules to help us improve them and make Puma Scan Professional even better. Puma Scan supports the following experimental features:
Puma Scan Professional provides users with the ability to enable analysis rules for JavaScript files. These experimental rules are designed to help you identify potential security issues in your JavaScript code. The default value is false.
The following JSON block shows the Javascript rules enabled in the experimental settings options:
"ExperimentalSettings": {
    "EnableJavascriptRules": true
}
Puma Scan End User Edition is an extension for the Visual Studio and Visual Studio Code integrated development environments. Once installed users can perform secure code analysis within their development environment. Puma Scan End User Edition can be configured to run code analysis in near real-time or on demand.
The End User extension supports the following IDEs:
Visual Studio Code
Visual Studio Community, Professional and Enterprise 2019
Visual Studio Community, Professional and Enterprise 2022
Puma Scan End User Edition for Visual Studio can be configured to scan in two different modes. This setting can be accessed in Puma Scan’s Configure menu.
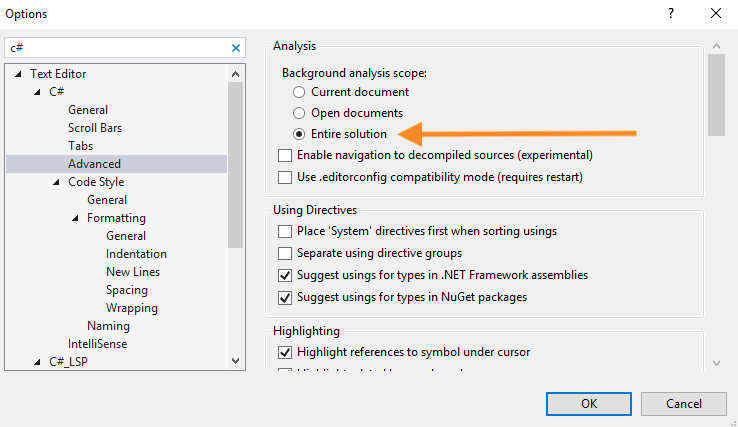
The default scan mode. Puma Scan code analyzers will perform near real-time analysis. Findings will display in the Error List and Puma Scan Tool Windows. When this mode is enabled, users will need to ensure Visual Studio’s background analysis scope is set to Entire Solution.
Puma Scan code analyzers will only run when a scan is initiated. Findings will display in the Puma Scan Tool Window.
Figure 1: The Puma Scan Configure Dialog Window.
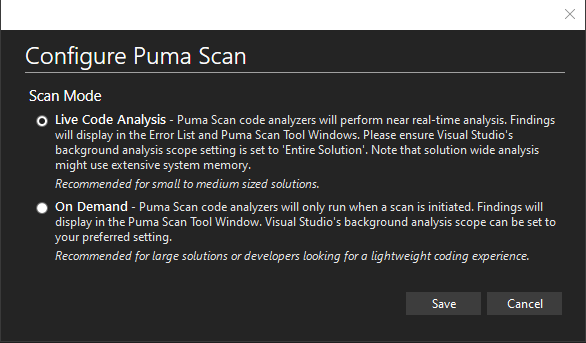
Figure 2: Visual Studio Background Analysis Scope setting (required for Live Code Analysis only)
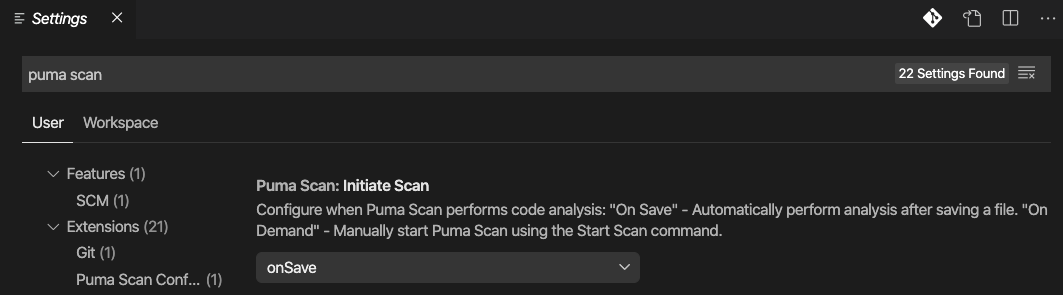
Puma Scan End User Edition for Visual Studio Code supports two different scanning modes. This setting can be accessed in the Extension section in Visual Studio Code Settings window.
The default scan mode. Automatically scans the source code and displays the results in the Problems window after saving a document. Findings will display in Visual Studio Code’s Problems window.
Puma Scan code analyzers will only run when a scan is initiated. Findings will display in Visual Studio Code’s Problems window.
Visual Studio Code’s Puma Scan Initiate Scan Setting.
Puma Scan Server Edition provides a command line interface for executing the Puma Scan security analyzers. The Server Edition installation adds PumaScan.exe to the Windows PATH, which can be invoked from cmd.exe and PowerShell prompts.
NOTE: The Server Edition must be run after restoring the package dependencies and building the solution or project.
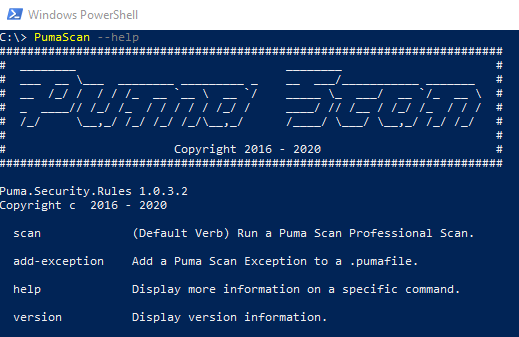
To get started, first run the PumaScan.exe --help command to view the available commands:
The default command when running Puma Scan Server Edition. Running this command will invoke a scan to execute using the specified options.
Adds a Puma Scan Exception to a .pumafile using the specified options.
Displays the Puma Scan version information.
Displays the help text screen.
The following example shows the Server Edition command line commands using the --help switch.
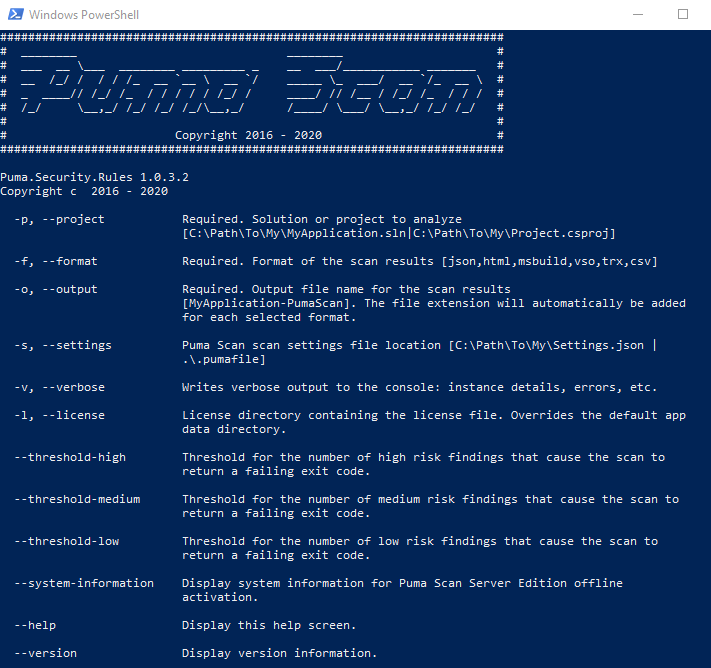
To get started, first run the PumaScan.exe scan --help command to view the scan options screen:
Full path to the solution (.sln) or project (.csproj) file to analyze. Argument is required. Examples:
Full path to the Puma Scan configuration settings file to use for the scan (e.g. Settings.json or repository specific .pumafile). Argument is required. Example:
Comma delimited list of export formats for the generated scan results. Options include json, html, msbuild, trx, vso, csv, sonarcloud. Each file will be written to the output directory specified by the --output switch. Argument is required.
Directory containing the Puma Scan license file (.puma). Overrides the default app data directory. Argument is optional.
Output file path and name for the generated scan results. The file extension will automatically be added for each file format specified by the --format switch. Argument is required.
True / false value that enables verbose scan diagnostic data to be written to the console during analysis. Argument is not required. The default is false.
In VSTS / Azure DevOps builds, enabling the Verbose flag and the VSO (Visual Studio Online) output formats allows Puma Scan to add security warnings to the MSBuild results summary. WARNING: An Azure DevOps limitation shows only the first 11 warnings. More details can be found in the Azure Forum #187596.
Sets a threshold on the allowable number of high risk results before the build task fails. For example, setting the value to 10 would stop the build if more than 10 high risk scan results are found during analysis. Argument is optional. The default value is empty string.
Sets a threshold on the allowable number of medium risk results before the build task fails. For example, setting the value to 10 would stop the build if more than 10 medium risk scan results are found during analysis. Argument is optional. The default value is empty string.
Sets a threshold on the allowable number of low risk results before the build task fails. For example, setting the value to 10 would stop the build if more than 10 low risk scan results are found during analysis. Argument is optional. The default value is empty string.
Displays the system information activation data needed for offline license activation.
Displays the Puma Scan version information.
Displays the help text screen.
The following example shows the Server Edition command line scan options using the --help switch.
The image on the right shows an example command to execute a scan using Puma Scan Server Edition.
The console output from the scan shows details as the scan executes.
Project Summary
Shows details about the given solution or project file including the location on disk, number of projects, and number of documents to be included in the scan.
Scan Summary
Displays details about the Puma Scan analysis:
Output Summary
Shows the output files generated for the scan results and the location on disk.
Threshold Validation
Shows details for any threshold comparisons made against the scan results. In this example, a value of 5 was given for the --threshold-high parameter. The output shows the threshold verification failed because 9 high risk findings were identified.
Exit Code
Puma Scan will exit with an exit code of Success (0) if the scan completes successfully with no errors and the threshold verification step passes all criteria.
The following code snippet shows an example command scanning the Puma Prey solution.
PumaScan.exe -p "C:\code\puma-prey\PumaPrey.sln" -s "C:\code\puma-prey\.pumafile" -f json,html -o "C:\code\puma-prey\PumaScan-Results" --threshold-high 5
The following screenshot shows the output from the code analysis.

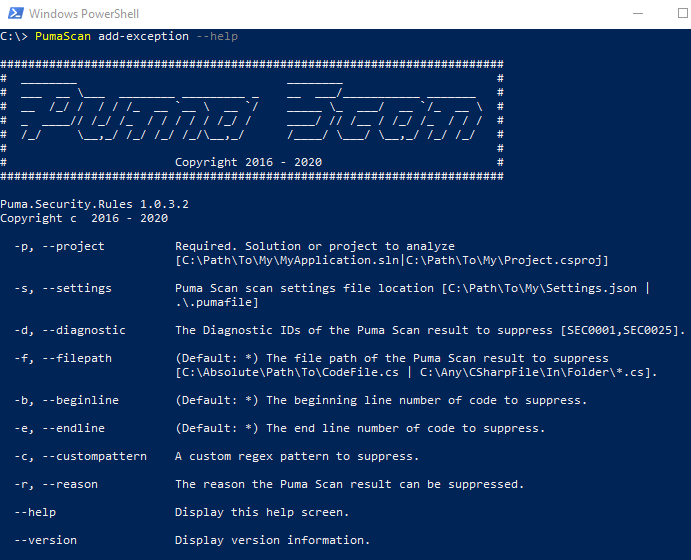
To get started, first run the PumaScan.exe add-exception --help command to view the add-exception options screen:
Full path to the solution (.sln) or project (.csproj) file to analyze. Argument is required. Examples:
Full path to the Puma Scan configuration settings file to use for the scan (e.g. Settings.json or repository specific .pumafile). Argument is optional. Example:
Comma delimited list of rule IDs. If no value supplied, the exception will apply to all rules. Argument is optional. Examples:
Relative path to the file containing the code to ignore. If no value supplied, the exception will apply to all files. If an absolute path is supplied, a relative path to the root of the project will be determined. Wildcards (*) and single character matches (?) are supported. Argument is optional. Examples:
Starting line number in the file that contains the code to ignore. Wildcard (*) is supported. Argument is optional. The default is wildcard (*).
End line number in the file that contains the code to ignore. Wildcard (*) is supported. Argument is optional. The default is wildcard (*).
Instances with a line of code matching the regular expression pattern are suppressed from the scan results. Argument is optional. The default is empty.
Justification from the lead engineer or security analyst for approving the exception. Argument is optional. The default is empty.
Displays the Puma Scan version information.
Displays the help text screen.
The following example shows the Server Edition command line add-exception options using the --help switch.
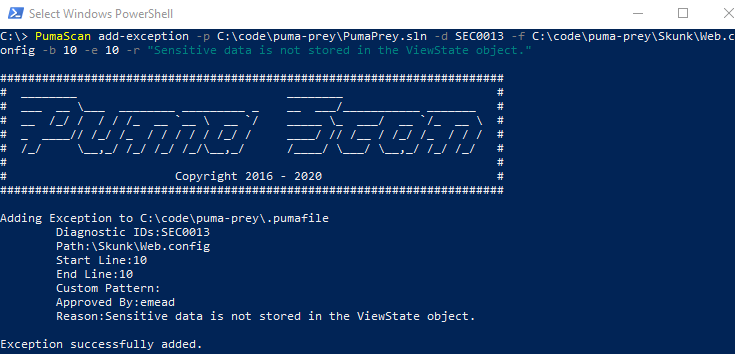
The image on the right shows an example command to add an exception using the Puma Scan Server Edition.
The console output from the command shows details of the exception that was added.
Exit Code
Puma Scan will exit with an exit code of Success (0) if the exception was added successfully with no errors.
The following code snippet shows an example command adding an exception to the Puma Prey solution’s .pumafile.
PumaScan add-exception -p C:\code\puma-prey\PumaPrey.sln -f C:\code\puma-prey\Skunk\Web.config -b 10 -e 10 -r "Sensitive data is not stored in the ViewState object."
The following screenshot shows the output from the add-exception command.
Integrating the Puma Scan Professional Server Edition into Azure DevOps on-premise (formerly VSTS) build pipelines requires DevSecOps teams to add two new build tasks.
Start by adding a new Command Line build task (Figure 1) to the pipeline. Then, configure the task to execute the Puma Scan Server Edition. The following fields must be set to successfully execute a scan (Figure 2):
Display Name
Enter a self describing name for the build task, such as Puma Scan. This value is displayed in the pipeline’s web interface as each task executes.
Tool
Enter the full path to where PumaScan.exe is installed on the build agent. This should match the directory selected when installing the Puma Scan Server Edition. For on-premise VSTS installations, consider installing Puma Scan in the C:\TfsBuildAgent\externals directory.
Arguments
Set the command line options required to run Puma Scan. Figure 2 shows a scan instructing Puma Scan to scan the PumaPrey-Scan.sln solution with the settings in the .pumafile, export the findings to HTML and JSON formats, store the results in the PumaResults directory, and fail the build if there are more than 5 high risk findings. See the Command Line Options for more details:
To archive the Puma Scan reports stored in the PumaResults directory, add a new Publish Build Artifacts build task (Figure 3) to the pipeline. Then, configure the task to store the Puma Scan reports on the build server. The following fields must be set to successfully store the reports (Figure 4):
Display Name
Enter a self describing name for the build task, such as Puma Scan Publish. This value is displayed in the pipeline’s web interface as each task executes.
Path to Publish
Enter the directory containing the Puma Scan reports. This directory should match the directory used in the --output (-o) command line argument. Continuing the example above, this field would be set to $(Build.Repository.LocalPath)\PumaResults.
Artifact Name
Enter a self describing name for the Puma Scan artifacts, such as Puma Scan. This is an arbitrary value that will be displayed on the Artifact Summary screen after the build completes.
Artifact Type
Select Server to store the artifacts in the web directory. Select File to access the files directly from the file system.
Run this task
Set this value to Even if a previous task has failed, unless the build was canceled to ensure the Puma Scan reports are archived even if the Puma Scan task fails due to threshold violations.
After the build completes, select the Puma Scan task to view the execution logs (Figure 5). The console output will display the project summary, scan summary, output summary, threshold violations, and exit code details.
Continuing the example above, the Puma Scan task displays a red X indicating that the task failed. The task is failing because the Puma Prey application contains more than 5 high risk findings, which exceeds the high threshold value. A successful code scan will produce a green check and allow the build pipeline to proceed through the remaining tasks.
See the Command Line Example for more details on the console output.
To view the Puma Scan reports (Figure 6):
1) Select the Build Id (e.g. Build 20190225.6) to view the Summary screen.
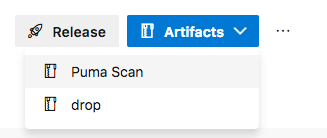
2) Select the Artifacts tab to view any files archived by the pipeline.
3) Press the Explore button to download and view the Puma Scan reports.
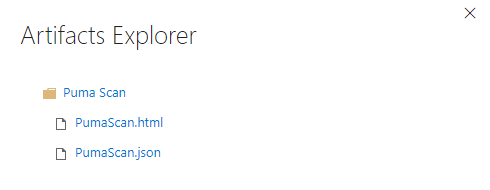
Use the Artifact Explorer to download and view the Puma Scan reports (Figure 7). In the example above, the --format (-f) switch was set to html,json, which instructs Puma Scan to create both .html and .json formatted files to be stored in the build archives.
Figure 1: Add a new Command Line build task to the pipeline.

Figure 2: Configure the Command Line build task to run Puma Scan.
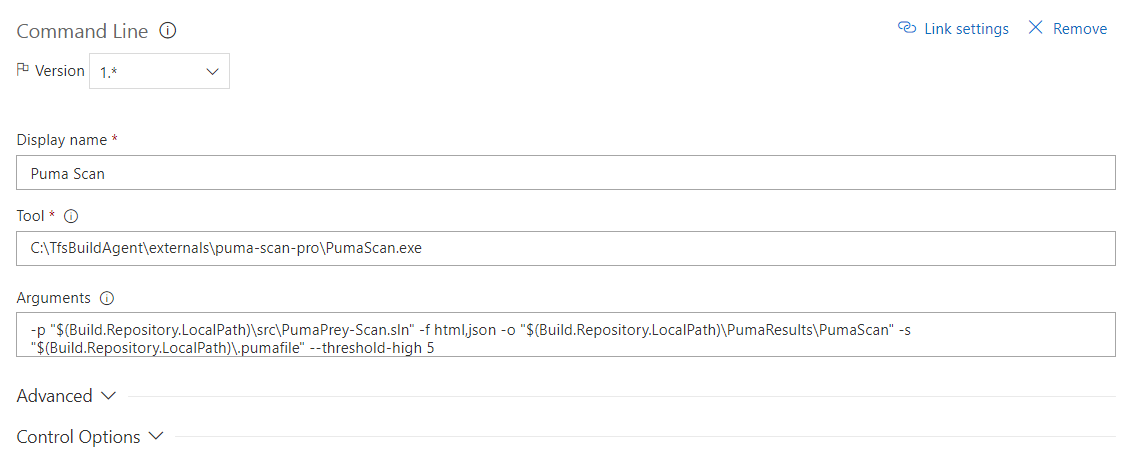
Figure 3: Add a new Publish Build Artifacts build task to the pipeline.
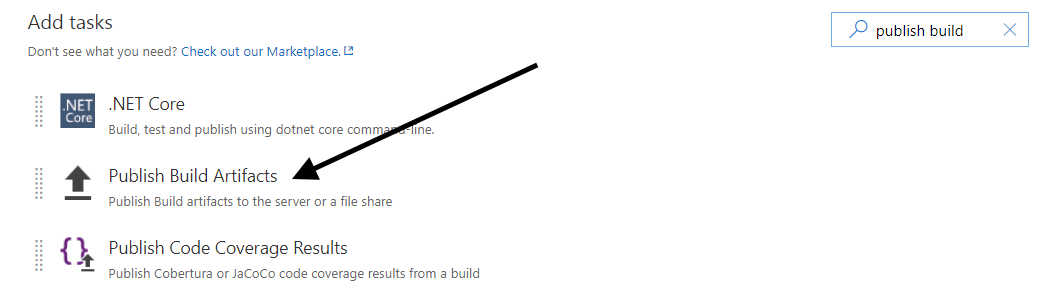
Figure 4: Configure the Publish Build Artifacts build task to archive the Puma Scan results.
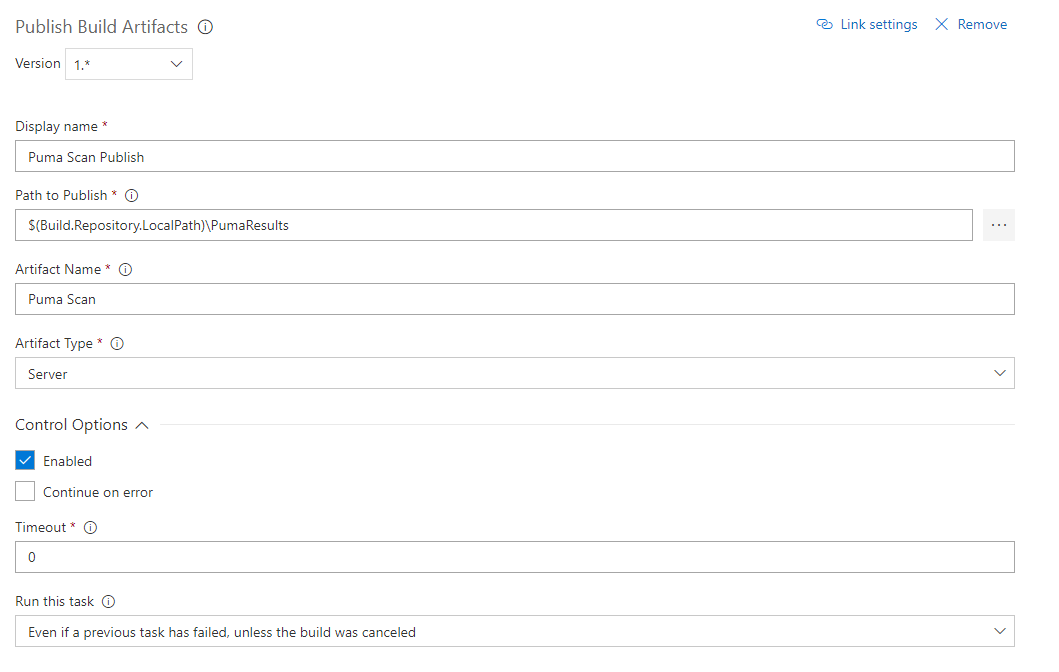
Figure 5: After the build completes, select the Puma Scan build task to view the execution logs.
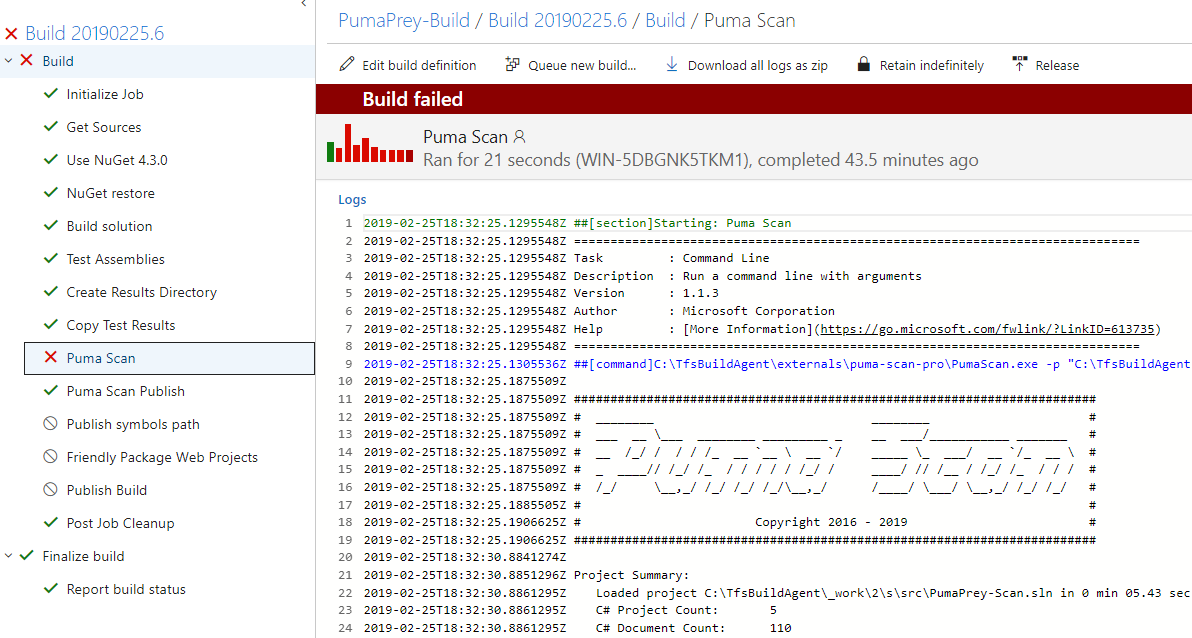
Figure 6: Select the Build Id and view the Artifacts tab.
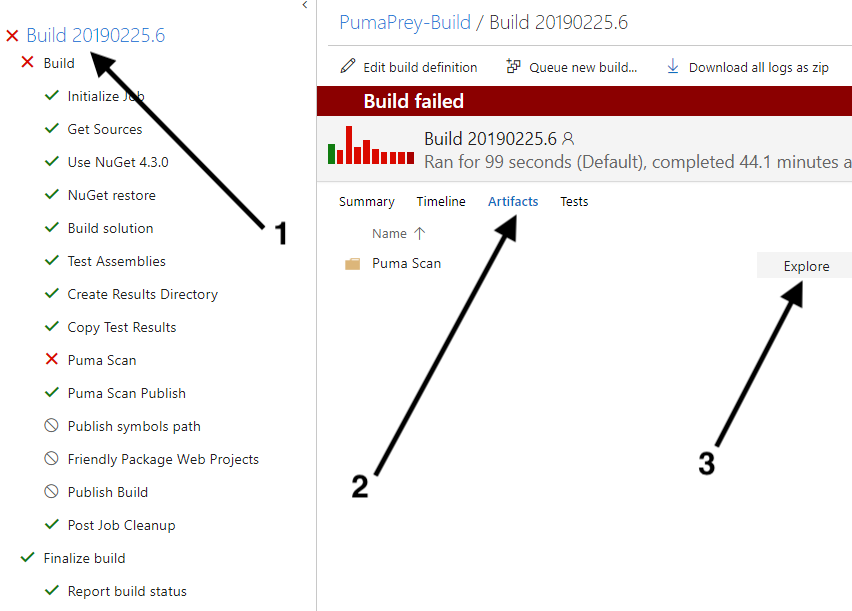
Figure 7: Explore and download the Puma Scan reports.
Integrating the Puma Scan Professional Server Edition into Jenkins requires a Windows Server node with the Jenkins build agent. See the Jenkins Documentation for details.
Install the Puma Scan Professional Server Edition on the Windows Server build agent. Follow the Puma Scan Professional Server Edition Installation Guide for help completing this step.
Install the Warnings Next Generation Jenkins plugin for parsing and displaying the Puma Scan msbuild formatted results.
Figure 1 shows the Jenkinsfile declarative syntax for running Puma Scan using PowerShell. The scan format specifies the msbuild option, which can be parsed by the Warnings Next Generation recordIssues function. After parsing the scan results, all Puma Scan reports are archived using the archiveArtifacts function.
Figure 2 shows the MSBuild Warnings screen with the integrated Puma Scan results. Figure 3 shows an individual Puma Scan warning after navigating into the MSBuild results for a given instance.
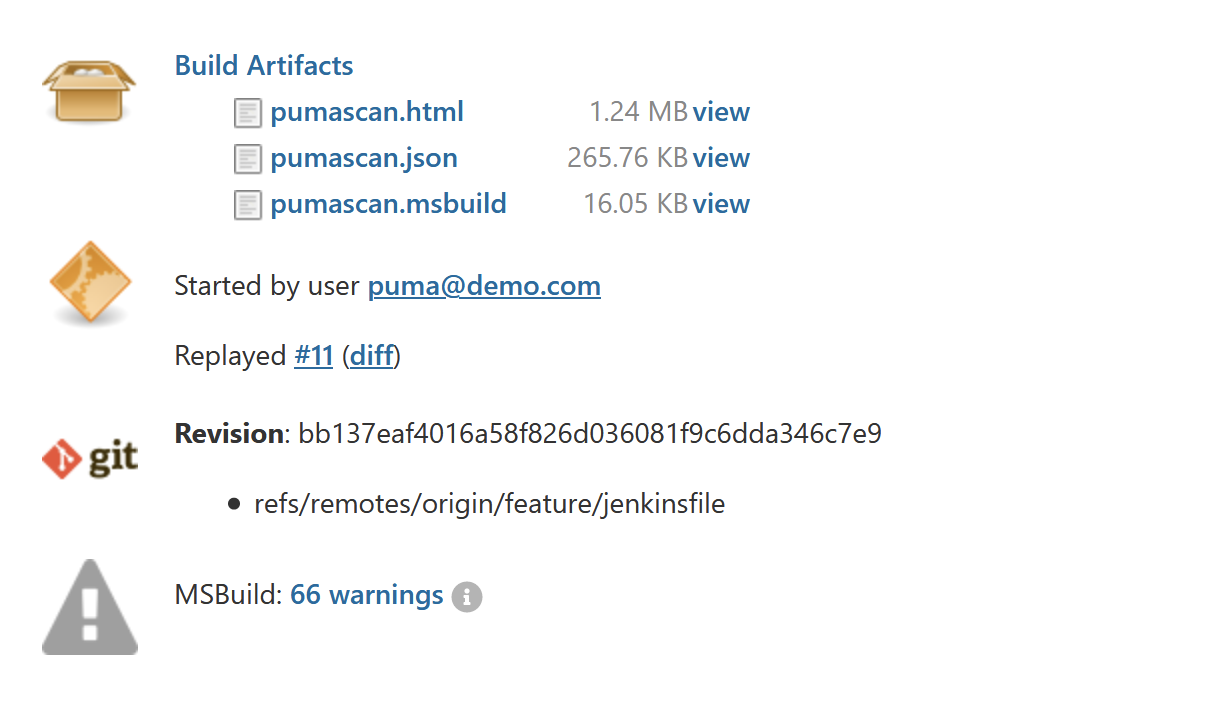
Figure 4 shows Puma Scan results available to view and download from the Build Artifacts screen for the job.
Figure 1: Puma Scan Jenkinsfile stage performing a scan, parsing the MSBuild formatted results, and archiving the reports.
stage('Puma Scan') {
  steps {
    powershell """
      pumascan scan -p ${env.SOLUTION} -s ./.pumafile -o ./pumascan -f msbuild,json,html
    """
    recordIssues(tools: [msBuild(pattern: 'pumascan.msbuild')])
    archiveArtifacts "pumascan*"
  }
}
Figure 2: MSBuild Summary displaying Puma Scan results.

Figure 3: MSBuild details displaying a Puma Scan warning.

Figure 4: Build Artifacts storing the Puma Scan reports.
Puma Scan Cloud CI Edition uses the Puma Scan Pro container image to scan source code in GitHub Action and GitLab CI/CD pipelines. The container image only supports Linux builds using .NET 6 and higher. Windows is not supported.
The Cloud CI container image uses a Puma Scan license variable and the built in GitHub Action / GitLab CI identity providers to authenticate and activate each pipeline. See the installation instructions for details on configuring the Cloud CI environment variable.
To use the Puma Scan GitHub Action, add the job to your workflow file. The example workflow file to the right does the following:
Defines when Puma Scan will be executed. The example shows how to execute Puma Scan when a pull request is created against the main branch. Other options include push, schedule, and workflow_dispatch.
Most GitHub Action jobs require permission to read the contents of the repository and GH Actions. The Puma Scan Action also requires permission to request an identity token from the GitHub Actions Identity Provider for license validation and pipeline activation. The remaining permissions are optional depending on how you want to display the Puma Scan results inside of GitHub. Displaying results using Advanced Security, check (unit test) results, or adding a pull request comment will require additional permissions.
Use the Puma Scan GitHub Action to execute Puma Scan against the repository’s source code. This step runs Puma Scan v1.6.0, but you will need to choose the appropriate version of the scanner. Next, you need to set the PUMA_LICENSE environment variable to the secret storing your license data. Then, set the input parameters required to execute the scan. This example scans the Web.csproj project in the repository, creates several output files (json,html,sarif,trx), uses a custom scan configuration file located at ./.pumafile.
See the Puma Scan GitHub Action documentation for all of the input parameter options.
Use the actions/upload-artifact action to archive the Puma Scan results. The artifact will be available for download from the GitHub Actions Summary screen after the job completes.
Use the dorny/test-reporter action to parse the Puma Scan test results. The action will read the puma-scan.trx file and publish the test results on the pull request checks page.
The Puma Scan run job will output several parameters from the test results that can be used in subsequent jobs. The output variables include the conclusion, number of passed tests, number of failed tests, URL to the HTML report, and a reaction to use on the pull request comment.
The check job will always run and fail if any Puma Scan tests failed. This job will use the needs keyword to depend on the run job. If the run job fails, the check job will also fail and stop the pipeline from proceeding to the next job.
The comment job will create or update a comment on the pull request with a link to the Puma Scan test results. The comment will include a table with the status, number of passed tests, and number of failed tests. The comment will also include a reaction based on the number of failed tests.
If you organization has GitHub Advanced Security enabled, you can publish the Puma Scan SARIF results to the Advanced Security dashboard. This step is optional and requires the security-events: write permission in the job permissions section. The github/codeql-action/upload-sarif action will read the SARIF file and publish the results to Advanced Security.
Add the following pumascan.yaml workflow to your repository to run Puma Scan when a merge request to the main branch is created. The Puma Scan job will write the result files (JSON, HTML, SARIF, TRX) to the ./security-analysis directory.
name: Puma Scan Professional

# 1: Define when Puma Scan will run
on:
  pull_request:
    branches: [main]

# 2: Set the job permissions
permissions:
  actions: read           # required: read gh actions
  contents: read          # required: read access to the repo
  id-token: write         # required: action requests a jwt for license validation
  security-events: write  # optional: write results to advanced security
  checks: write           # optional: write test results
  pull-requests: write    # optional: write results to PR comment

jobs:
  run:
    name: scan
    runs-on: ubuntu-latest
    steps:
      - uses: actions/checkout@v4

      # 3: Run Puma Scan
      - name: run puma scan
        uses: pumasecurity/puma-scan-pro-action@v1.6.0
        env:
          PUMA_LICENSE: ${{ secrets.PUMA_LICENSE }}
        with:
          project-paths: "./src/Web.csproj"
          output-file: "./security-analysis/puma-scan"
          output-formats: "json,html,sarif,trx"
          settings-paths: "./.pumafile"

      # 4: Archive the Puma Scan results
      - name: archive
        uses: actions/upload-artifact@v4.3.1
        with:
          name: pumascan
          path: "./security-analysis/*"
To parse the Puma Scan test results and display the data on the pull request checks screen, add the following job to the workflow file.
      # 5: Publish the Puma Scan test results
      - name: publish tests
        id: tests
        uses: dorny/test-reporter@v1.8.0
        with:
          name: "pumascan"
          path: "./security-analysis/puma-scan.trx"
          reporter: "dotnet-trx"
          fail-on-error: false
          fail-on-empty: true
To evaluate the Puma Scan test results and write the status back to the pull request comments, add the following outputs to the run job and then create the pull request comment.
    # 6: Output parameters with the test results from the run job
    outputs:
      conclusion: ${{ steps.tests.outputs.conclusion }}
      passed: ${{ steps.tests.outputs.passed }}
      failed: ${{ steps.tests.outputs.failed }}
      url: ${{ steps.tests.outputs.url_html }}
      reaction: ${{ steps.tests.outputs.failed > 0 && 'eyes' || 'rocket' }}

  # 7: The check job will always run and fail if any Puma Scan tests failed
  check:
    name: pumascan
    runs-on: ubuntu-latest
    if: ${{ always() }}
    needs: [run]
    steps:
      - run: |
          echo "pumascan status: ${{ needs.run.outputs.conclusion }}"
          exit ${{ needs.run.outputs.failed }}

  # 8: The comment job will create or update a comment on the pull request with a link to the Puma Scan test results
  comment:
    runs-on: ubuntu-latest
    name: comment
    needs: [run]
    steps:
      - name: find comment
        uses: peter-evans/find-comment@v3.0.0
        id: find-comment
        with:
          issue-number: ${{ github.event.pull_request.number }}
          comment-author: "github-actions[bot]"
          body-includes: pumascan results
      - name: set comment
        uses: peter-evans/create-or-update-comment@v3.0.0
        id: create-replace-comment
        with:
          comment-id: ${{ steps.find-comment.outputs.comment-id }}
          issue-number: ${{ github.event.pull_request.number }}
          body: |
            ## pumascan results
            | Status | Pass | Fail |
            |--------- | ----- |----|
            | ${{ needs.run.outputs.conclusion }}| :white_check_mark: ${{ needs.run.outputs.passed }} | :x: ${{ needs.run.outputs.failed }} |

            [View Test Results](${{ needs.run.outputs.url }})
          reactions: ${{ needs.run.outputs.reaction }}
          edit-mode: replace

  # 9: Publish the Puma Scan SARIF results to GitHub Advanced Security
  sarif:
    name: sarif
    runs-on: ubuntu-latest
    if: ${{ always() }}
    needs: [run]
    steps:
      - name: Publish SARIF Results
        uses: github/codeql-action/upload-sarif@v3
        with:
          sarif_file: ./security-analysis/puma-scan.sarif
          category: "security"
To use the Puma Scan GitLab CI Component, include the componenet in your pipeline. The example job to the right does the following:
The base GitLab CI/CD pipeline defintion gitlab-ci.yml template configures the pipeline. This configuration starts by including a mr.yml template that will contain all of the merge request checks. Then, defines the pipeline stages: initialize, test, build, and deploy stage. Puma Scan will be executed inside the test stage alongside other common tests such as unit tests, integration tests, end-to-end tests, and other security checks.
The mr.yml template includes the Puma Scan GitLab CI component. The input parameters define how the component will be run. The mr-pipeline-enabled parameter tells the component to run on merge request events instead of on commits to the default branch (this is the default configuration). The license-encoded parameter reads the base64 encoded license data from the global pipeline varaible and passes the value into the component. The component will automatically base64 decode the value and place it into the PUMA_LICENSE environment varaible before starting the scan. The remaining options control how Puma Scan will execute.
The full list of input parameters and their description can be found in the Puma Scan GitLab CI Component documentation.
The pipeline configuration gitlab-ci.yml file includes a mr.yml template and the stages for the pipeline.
#1: GitLab CI Pipeline Configuration
include:
  - ".gitlab/pipelines/mr.yml"

stages:
  - initialize
  - test
  - build
  - deploy
The mr.yml template inlucdes the Puma Scan GitLab CI component. The input parameters instruct the component to run Puma Scan on merge request events, sets the encoded license variable, and specifies the scan options.
#2: Include the Puma Scan GitLab CI component
include:
  - component: gitlab.com/pumasecurity/ci-components/puma-scan-pro@1.6.2
    inputs:
      mr-pipeline-enabled: true
      license-encoded: $PUMA_LICENSE_ENCODED
      stage: test
      project-paths: "./src/Coyote/Coyote.csproj"
      output-formats: "json,html,sarif,msbuild"
      output-file: "./ci-tests/pumascan"
      settings-paths: "./.pumafile"
Puma Scan Azure DevOps Edition is an extension for Azure DevOps Build pipelines. After installing the Puma Scan extension in an Azure DevOps organization, DevOps teams can perform secure code analysis inside cloud-hosted build pipelines.
The Azure DevOps extension is not supported for on-premise Azure DevOps (VSTS) hosted build agents. See the Azure DevOps (On-Premise) Integration for details on configuring the Server Edition for hosted agents.
Azure DevOps pipelines must restore the package dependencies and building the solution or project before running the Puma Scan build task.
The following settings are available when configuring the Azure DevOps Puma Scan build task.
Relative path to the solution or project file to analyze. For example, MyApplication.sln or MyProject.csproj.
Relative path to the Puma Scan settings file (.pumafile) in the code repository. The field is optional and the default is empty, which runs Puma Scan with the default settings.
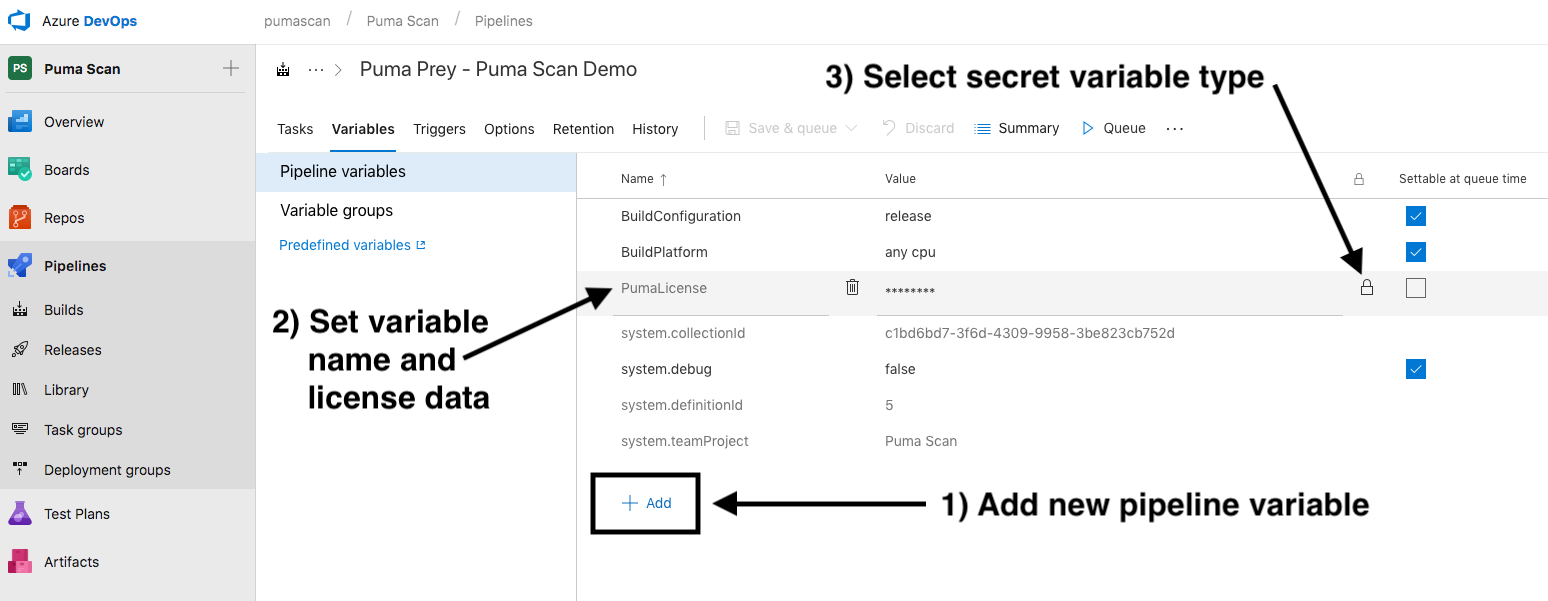
The Puma Scan Professional Azure DevOps license can be obtained from portal.pumascan.com. Store the value in an encrypted pipeline variable. Then, reference the variable name in the build step. The default variable name is $(PumaLicense).
Select the export formats for the generated scan results: json, html, msbuild, vso, or sonarcloud. Each file will be uploaded to the build archives.
Output file name for the generated scan results [MyApplication-PumaScan]. The file extension will automatically be added for each selected scan results format. All output files will automatically be added as build artifact.
True / false value that enables verbose scan diagnostic data to be written to the console during analysis.
Sets a threshold on the allowable number of high risk results before the build task fails. For example, setting the value to 10 would stop the build if more than 10 high risk scan results are found during analysis.
Sets a threshold on the allowable number of medium risk results before the build task fails. For example, setting the value to 10 would stop the build if more than 10 medium risk scan results are found during analysis.
Sets a threshold on the allowable number of low risk results before the build task fails. For example, setting the value to 10 would stop the build if more than 10 low risk scan results are found during analysis.
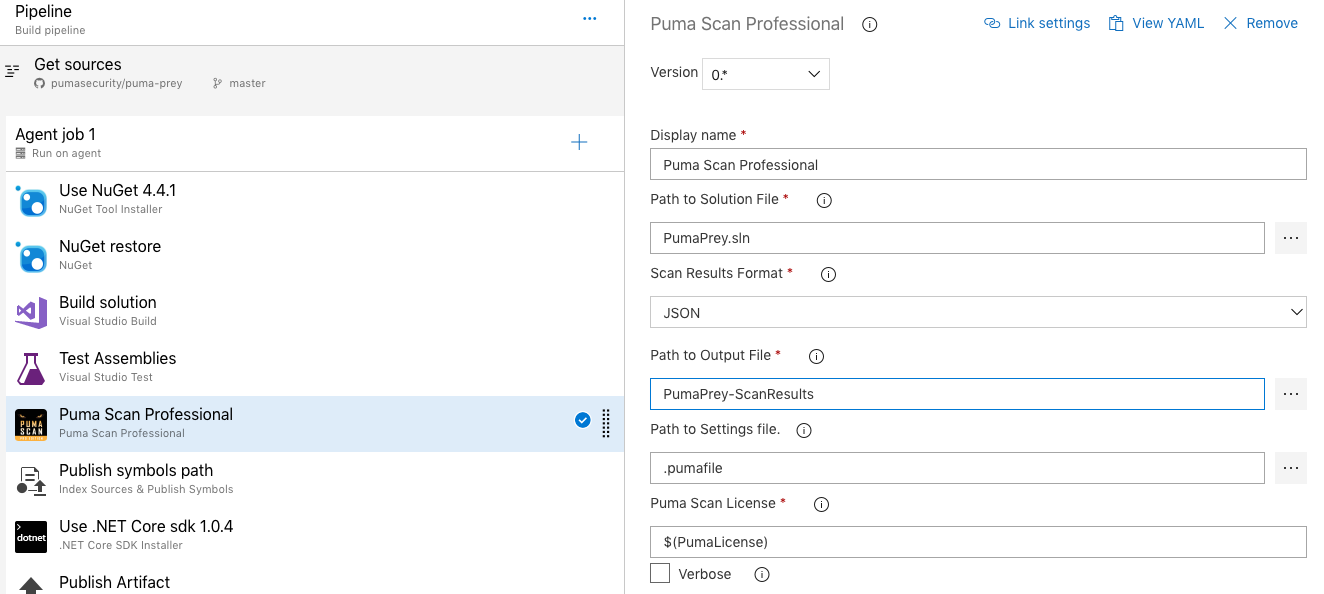
The following example shows a build task with example settings.
The following example shows how to set the PumaLicense pipeline variable.
The following example shows how to view the Puma Scan build artifacts.
The following example shows how to view the Puma Scan result details.

The Puma Scan Professional Edition scanner performs data flow analysis from data entering a vulnerable sink to the original source of the data. For rules performing data flow analysis, the source type (e.g. request parameter) ultimately determines if a diagnostic is raised by the scanner. The following documentation provides a list of the sources automatically built into the scanner and examples showing how to create custom tainted sources.
The following tainted sources are built into the scanner out of the box:
The following example shows a default tainted source that flags all data coming from the System.Web.HttpRequest object as tainted.
{
    "RuleIds": [],
    "Flag": "Web",
    "Syntax": "ElementAccessExpressionSyntax",
    "Namespace": "System.Web",
    "Type": "HttpRequest",
    "Property": "this[]",
    "Method": "*"
}
The following example shows a default tainted source that flags all methods (including the parameters) in classes inheriting from System.Web.Mvc.Controller as tainted.
{
    "RuleIds": [],
    "Flag": "Web",
    "Syntax": "SimpleBaseTypeSyntax",
    "Namespace": "System.Web.Mvc",
    "Type": "Controller",
    "Property": "*",
    "Method": "*"
}
The Puma Scan Professional Edition allows users to define custom tainted sources to help identify third party or custom entry points that should be marked as tainted. Common examples include third party frameworks that accept user request data or libraries that retrieve external data from web service APIs.
The following section describes the schema for adding custom tainted sources to the scanner:
The RuleIds array limits the custom tainted source to a set rule id or ids. The example to the right shows how to limit the custom source to only rule id SEC0106, SEC0107, and SEC0108. The default value is an empty array (e.g. []), which means the new tainted source will apply to all diagnostic rules.
Logical grouping to help define the custom tainted source. This field is not required for the analyzers to pick up additional sources. Valid options are as follows:
The default is None.
The dotnet compiler API represents the different syntax nodes nodes in a syntax tree with classes inside the Microsoft.CodeAnalysis namespace. This property is required to be set to the appropriate syntax type to register the new custom source with the scanner. For more information on how to locate the correct syntax type, please see Syntax Visualizer section.
The namespace containing the custom tainted sources. In the Telerik example to the right, the namespace containing the object to add to the tainted sources list is Telerik.Web.UI. This field is required.
Filters the tainted source in a namespace down to an individual object type. This could also be referred to as the class name. In the example to the right, the tainted sources in the Telerik.Web.UI namespace is filtered down to only instances coming from the RadAutoCompleteBox type. This field is required and supports the wildcard character (*) to tell the scanner to taint all types in a given namespace.
Filters the tainted source in an object down to a specific property (getter / setter). In the example to the right, the tainted source will only come from the “Text” property, which will contain user supplied input. This field is required and supports the wildcard character (*). If identifying a method only (see below), set this field to the wildcard character (*).
Filters the tainted source in an object down to a specific method. This attribute can be used independently of the property field above (e.g., Object.DoSomething()). Or in combination with the property field above to filter a property down to the getter (e.g., “get”) or setter (e.g., “set”). In the example to the right, the tainted source will only come from the “get” method called on the “Text” property. This field is required and supports the wildcard character (*).
The following example shows how to create a new tainted source identifying unsafe data coming from the third party Telerik RadAutoCompleteBox control.
{
    "RuleIds": ["SEC0106", "SEC0107", "SEC0108"],
    "Flag": "Web",
    "Syntax": "ElementAccessExpressionSyntax",
    "Namespace": "Telerik.Web.UI",
    "Type": "RadAutoCompleteBox",
    "Property": "Text",
    "Method": "get"
}
Let’s walk through an example showing how to create a custom tainted source. Consider the code snippet to the right. In this example, the GenerateReport method reads a Report from a shared library and passes the data into a vulnerable Entity Framework query. Should this code block raise a SQL Injection warning? Well, it depends on the source of the report.Name data element.
Let’s assume that the Report library is an internal DLL and we don’t have the source code. Puma Scan’s source code analyzer is unable to trace calls into reference DLLs (aka third party libraries) to determine the source of the report data. By default, no warning will be raised.
In cases like this, you need to tell the source code analyzer if specific properties or methods in external libraries should be treated as unsafe (e.g., tainted).
The following example shows the GenerateReport GET request action reading a user’s report data and using the Name field to construct a SQL query. While it is obviously vulnerable to SQL Injection, exploiting the issue depends on the source of the Name value.
[HttpGet]
public ActionResult GenerateReport()
{
    //Get report data for the current user
    Guid userId = new Guid(User.Identity.GetUserId());
    Report report = Report.GetReport(userId);

    //Mark the report as generated
    using (var context = new RabbitDBContext())
    {
            string query = string.Format("UPDATE Report SET Status = 1 WHERE Name = {0}", report.Name);
            context.Database.ExecuteSqlCommand(query);
    }

    //Return report data to the view
    return View(report);
}
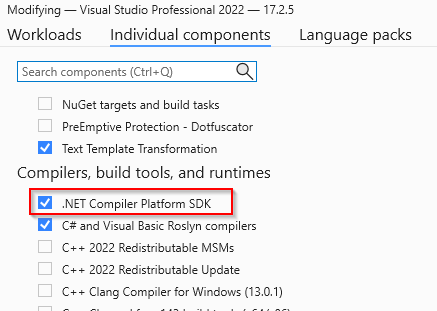
To do this, ensure you have installed the .NET Compiler Platform SDK.
In Visual Studio 2019 or 2022, run the Visual Studio Installer, press “Modify”, and browse to “Individual Components > Compilers, Build Tools, and Runtimes”. Select and install the “.NET Compiler Platform SDK” (shown to the right in Figure 3).
Figure 3: Visual Studio 2022 - Adding the Compiler SDK option
Using the Syntax Visualizer, inspect the tainted source code and identify the syntax type of the custom source. To do this:
In this example, the syntax type is the InvocationExpressionSyntax, which should be entered for new the custom source’s Syntax property.
Next, use the Syntax Visualizer to locate the Namespace, Type, Property, and Method values (highlighted to the right in Figure 5). To locate these values, right click the node in the Syntax Tree and select “View Symbol”. The following properties will provide the remaining fields:
More details on using the Syntax Visualizer can be found in the Roslyn Documentation.
Figure 4: Syntax Visualizer - Finding the Syntax Type*
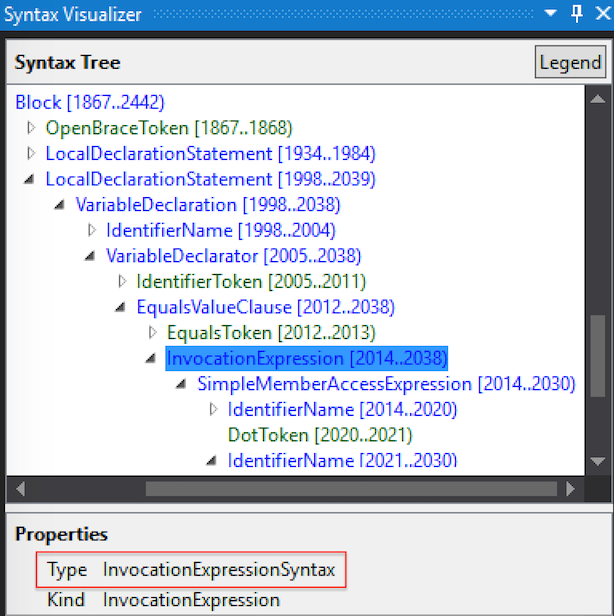
Figure 5: Syntax Visualizer - Symbol Properties*
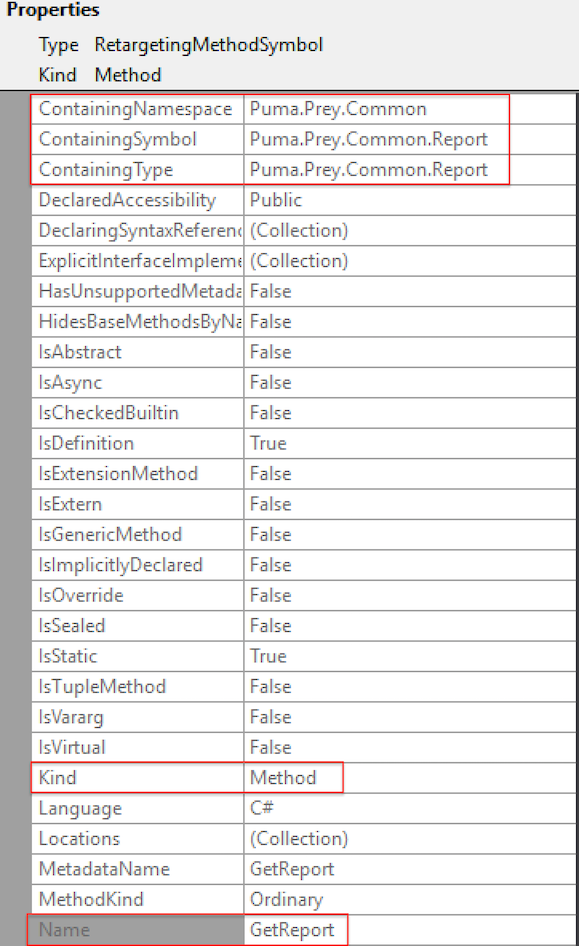
Finally, let’s add the new tainted source identifying the Puma.Prey.Common.Report.GetReport method as unsafe.
The following example shows the new custom tainted source to identify the Puma.Prey.Common.Report.GetReport method as a tainted source.
"CustomTaintedSources": [
    {
        "RuleIds": [] ,
        "Flag": "Web",
        "Syntax": "InvocationExpressionSyntax",
        "Namespace": "Puma.Prey.Common",
        "Type": "Report",
        "Property": "*",
        "Method": "GetReport"
    }
]
The Puma Scan Professional Edition performs data flow analysis from data entering a vulnerable sink back to the original source of the data. For rules performing data flow analysis, data passing through a valid cleanse method will suppress the diagnostic warning. The following documentation provides a list of cleanse methods built into the scanner and examples showing how to create custom cleanse methods.
The following cleanse methods are built into the scanner out of the box to suppress diagnostics related to injection vulnerabilities:
Cross-site Scripting rules (SEC0024, SEC0100, SEC0101, SEC0102, SEC0103, SEC0104, SEC0105) will suppress tainted sources passing through the following methods:
LDAP Injection rules (SEC0014) will suppress tainted sources passing through the following methods:
Unvalidated redirect rules (SEC0109, SEC0110) will suppress tainted sources passing through the following methods:
The following example shows a custom cleanse method that will cleanse XSS tainted source data before raising a diagnostic in cross-scripting rules. The configuration marks data passing through an InvocationExpressionSyntax in the System.Web.Security.AntiXss.AntiXssEncoder.HtmlEncode method as safe.
{
    "RuleIds": ["SEC0024", "SEC0100", "SEC0101", "SEC0102", "SEC0103", "SEC0104", "SEC0105"],
    "Flag": "Web",
    "Syntax": "InvocationExpressionSyntax",
    "Namespace": "System.Web.Security.AntiXss",
    "Type": "AntiXssEncoder",
    "Method": "HtmlEncode"
},
The Puma Scan Professional Edition allows users to define custom cleanse methods to identify security controls within the application and eliminate false positives. Common examples include validation routines and encoding libraries.
The RuleIds array limits the custom cleanse methods to a set rule id or ids. The example to the right shows how to limit the custom source to only rule id SEC0024. The default value is an empty array (e.g. []), which means the new cleanse method will apply to all diagnostic rules.
Logical grouping to help define the custom cleanse methods. This field is not required for the analyzers to pick up new cleanse methods. Valid options are as follows:
The default is None.
The dotnet compiler API represents the different syntax nodes nodes in a syntax tree with classes inside the Microsoft.CodeAnalysis namespace. This property is required to be set to the appropriate syntax type to register the new cleanse method with the scanner. For more information on how to locate the correct syntax type for a given method, please see Syntax Visualizer section.
The namespace containing the cleanse method. In the example to the right, the namespace containing the cleanse method is is Microsoft.Security.Application. This field is required.
Filters the cleanse methods in a namespace down to an individual object type. This could also be referred to as the class name. In the example to the right, the class containing the cleanse method in the Microsoft.Security.Application namespace is filtered down to the Encoder class type. This field is required and supports the wildcard character (*) to register all classes in the namespace.
Filters the cleanse method in an class to a specific method name. In the example to the right, the cleanse method is set to HtmlEncode. This field is required and supports the wildcard character (*).
The following example shows a custom cleanse method that will cleanse XSS tainted source data before raising a diagnostic in SEC0024. The configuration marks data passing through an InvocationExpressionSyntax in the Microsoft.Security.Application.Encoder.HtmlEncode method as safe.
{
    "RuleIds": ["SEC0024"],
    "Flag": "Web",
    "Syntax": "InvocationExpressionSyntax",
    "Namespace": "Microsoft.Security.Application",
    "Type": "Encoder",
    "Method": "HtmlEncode"
},
To create a custom cleanse method, ensure you have done the following:
Let’s walk through an example showing how to create a custom cleanse method. Consider the code snippet to the right. In this example, the Download method accepts a request parameter called fileName that is eventually concatenated into a file path used to download a file from the file system. Should this code block raise a path tampering vulnerability? Well, it depends on the effectiveness of the Validator.IsValidFilePath method.
During our code review, we determine that the Validator.IsValidFilePath method is using strong whitelist validation to restrict input to alphanumeric characters. But, the Puma Scan analyzer is raising a diagnostic warning because this method is not registered as a valid cleanse method.
In cases like this, you need to tell the source code analyzer that the custom cleanse method mitigates the vulnerability. Doing so will suppress the diagnostic warning if a tainted source passes through the cleanse method.
Let’s add the new cleanse method and prevent the path tampering false positive. To do this:
The path tampering false positive is from rule id SEC0111. As shown in the configuration to the right, add “SEC0111” to the RuleIds array.
This flag can help with grouping and querying the cleanse methods. In this case, because the cleanse method is in a web entry point, we can set the value to “Web”. You can set this to “None” if you do not want to use this field.
Using the Syntax Visualizer, we identified that the invocation of the cleanse method is a InvocationExpressionSyntax type.
The namespace containing the path tampering validation method is Puma.Prey.Common.Validation.
The type / class name is Validator.
The cleanse method is called IsValidFilePath.
The following code example shows a download method accepting a fileName request parameter, which is then validated by a custom method called Validator.IsValidFilePath.
[HttpPost]
public ActionResult Download(string fileName)
{
    if (!Validator.IsValidFilePath(fileName))
        return new HttpNotFoundResult();

    return new FilePathResult("C:\\temp\\downloads\\" + fileName, "application/octet-stream");
}
The following custom cleanse method removes SEC0111 warnings when source data passes through the Puma.Prey.Common.Validation method.
"CustomCleanseMethods": [
    {
        "RuleIds": [
        "SEC0111"
        ],
        "Flag": "Web",
        "Syntax": "InvocationExpressionSyntax",
        "Namespace": "Puma.Prey.Common.Validation",
        "Type": "Validator",
        "Method": "IsValidFilePath"
    }
]
The Puma Scan Professional Edition supports adding custom sinks to the following rules to reduce false negatives in custom or 3rd party libraries:
The RuleIds array sets the custom sink to a specific rule id or ids. The example to the right shows how apply a custom sink to only rule id SEC0107.
Logical grouping to help define the custom cleanse sinks. This field is not required for the analyzers to pick up new sinks. Valid options are as follows:
The default is None.
The dotnet compiler API represents the different syntax nodes nodes in a syntax tree with classes inside the Microsoft.CodeAnalysis namespace. This property is required to be set to the appropriate syntax type to register the new custom sink with the scanner. For more information on how to locate the correct syntax type, please see Syntax Visualizer section. The example to the right is looking for ObjectCreationExpressions (i.e. the constructor) of the System.Data.Odbc.OdbcCommand object.
The namespace containing the custom sink. In the example to the right, the namespace containing the object to add to the custom sinks list is System.Data.Odbc. This field is required.
Filters the custom sink in a namespace down to an individual object type. This could also be referred to as the class name. In the example to the right, the custom sink in the System.Data.Odbc namespace is filtered down to only instances of the OdbcCommand type. This field is required.
For property assignment sinks, filter the custom sink down to a specific property. In the example to the right, the custom sink is filtered to down to the OdbcCommand object’s CommandText property. This field is not required if the sink is a constructor or method invocation. The default is an empty string.
For property of method invocation sinks, filter the custom sink down to a specific method. This attribute can be used independently of the property field above (e.g., Object.DoSomething()). Or, in combination with the property field above to filter a property down to its getter (e.g., “get”) or setter (e.g., “set”). In the example to the right, the custom sink will apply only to the CommandText property’s set method. This field is not required if the sink is a constructor or method invocation. The default is an empty string.
For constructor or method invocation sinks, filter the custom sink down to a list of argument indexes and signatures (optional). Index values can range from 0 - X, where X is the last parameter in the constructor or method. Optionally, the Signature property of the Argument array can be included. The Signature property is a string array of the particular signature the custom sink should apply to. In the example to the right, the custom sink is filtered down to unsafe data entering parameter index 0 for the three constructor signature combinations.
The following example shows the options available for adding custom sinks to the scanner.
"CustomSinks": [
  {
    "RuleIds": [
      "SEC0107"
    ],
    "Flag": "Database",
    "Syntax": "ObjectCreationExpressionSyntax",
    "Namespace": "System.Data.Odbc",
    "Type": "OdbcCommand",
    "Property": "CommandText",
    "Method": "set",
    "Arguments": [
      { "Index": 0, "Signature": ["string"] },
      { "Index": 0, "Signature": ["string", "System.Data.Odbc.OdbcConnection"] },
      { "Index": 0, "Signature": ["string", "System.Data.Odbc.OdbcConnection", "System.Data.Odbc.OdbcTransaction"] },
    ]
  }
]
To create a custom sink, ensure you have done the following:
Let’s walk through an example showing how to create a constructor custom sink. Consider the code snippet to the right. In this example, the btn_Search method reads a request parameter called txtSearch.Text that is eventually passed into the IBM DB2Command constructor. The constructor’s first argument sets the CommandText property, which is used to execute a dynamic query.
In cases like this, the IBM DB2 library is custom code that is not shipped with the .NET Framework. We need to tell the source code analyzer that this sink is vulnerable to SQL Injection.
Let’s add the new custom sink to the settings file to prevent the false negative. To do this:
The SQL Injection false negative is from rule id SEC0107 - SQL Injection: ADO.NET. As shown in the configuration to the right, add “SEC0107” to the RuleIds array.
This flag can help with grouping and querying the custom sinks. In this case, because the sink is a database entry point, we can set the value to “Database”. You can set this to “None” if you do not want to use this field.
Using the Syntax Visualizer, we identified that the invocation of the DB2Command constructor is an ObjectCreationExpressionSyntax type.
The namespace containing the path tampering validation method is IBM.Data.DB2.
The type / class name is DB2Command.
The argument position introducing the vulnerability occurs at position 0 for the possible constructor signatures of DB2Command.
The following code example shows a WebForms method reading a search parameter, concatenating the value into a SQL query, and running the command against a DB2 database.
private void btn_Search()
{
    DB2Connection cn = new DB2Connection();

    DB2Command cmd = new DB2Command("SELECT * FROM users WHERE username = '" + txtUserName.Text + "';", cn);

    DB2DataReader reader = cmd.ExecuteReader();
}
The following custom sink adds SEC0107 warnings when unsafe source data passes into the IBM.Data.DB2.DB2Command constructor’s first argument.
"CustomSinks": [
  {
    "RuleIds": [ "SEC0107" ],
    "Flag": "Database",
    "Syntax": "ObjectCreationExpressionSyntax",
    "Namespace": "IBM.Data.DB2",
    "Type": "DB2Command",
    "Arguments": [
      { "Index": 0 }
    ]
  }
]
To create a custom sink, ensure you have done the following:
Let’s walk through an example showing how to create a property custom sink. Consider the code snippet to the right. In this example, the btn_Search method reads a request parameter called txtSearch.Text that is eventually passed into the IBM DB2Command.CommandText property, which is used to execute a dynamic query.
In cases like this, the IBM DB2 library is custom code that is not shipped with the .NET Framework. We need to tell the source code analyzer that this sink is vulnerable to SQL Injection.
Let’s add the new custom sink to the settings file to prevent the false negative. To do this:
The SQL Injection false negative is from rule id SEC0107 - SQL Injection: ADO.NET. As shown in the configuration to the right, add “SEC0107” to the RuleIds array.
This flag can help with grouping and querying the custom sinks. In this case, because the sink is a database entry point, we can set the value to “Database”. You can set this to “None” if you do not want to use this field.
Using the Syntax Visualizer, we identified that the invocation of the DB2Command constructor is an ObjectCreationExpressionSyntax type.
The namespace containing the path tampering validation method is IBM.Data.DB2.
The type / class name is DB2Command.
The property name introducing the vulnerability is CommandText.
The property’s method, which in this case is set.
The following code example shows a WebForms method reading a search parameter, concatenating the value into a SQL query, and running the command against a DB2 database.
private void btn_Search()
{
    DB2Connection cn = new DB2Connection();

    DB2Command cmd = new DB2Command();
    cmd.Connection = cn;
    cmd.CommandText = "SELECT * FROM users WHERE username = '" + txtUserName.Text + "';";

    DB2DataReader reader = cmd.ExecuteReader();
}
The following custom sink adds SEC0107 warnings when unsafe source data passes into the IBM.Data.DB2.DB2Command.CommandText property.
"CustomSinks": [
  {
    "RuleIds": [ "SEC0107" ],
    "Flag": "Database",
    "Syntax": "MemberAccessExpressionSyntax",
    "Namespace": "IBM.Data.DB2",
    "Type": "DB2Command",
    "Property": "CommandText",
    "Method": "set",
  }
]
