Installation Guide
The Puma Scan End User Edition allows individual users to scan their .NET C# code for vulnerabilities inside of Visual Studio. Puma Scan's security analyzers are installed through a Visual Studio Extension, which is activated by purchasing a license file from pumascan.com. End User license files can be activated on up to three (3) workstations owned by a single user.
Create an account (if you do not have one) at pumascan.com
Sign In to pumascan.com
Press the Buy Now button to purchase a Puma Scan Pro: End User License
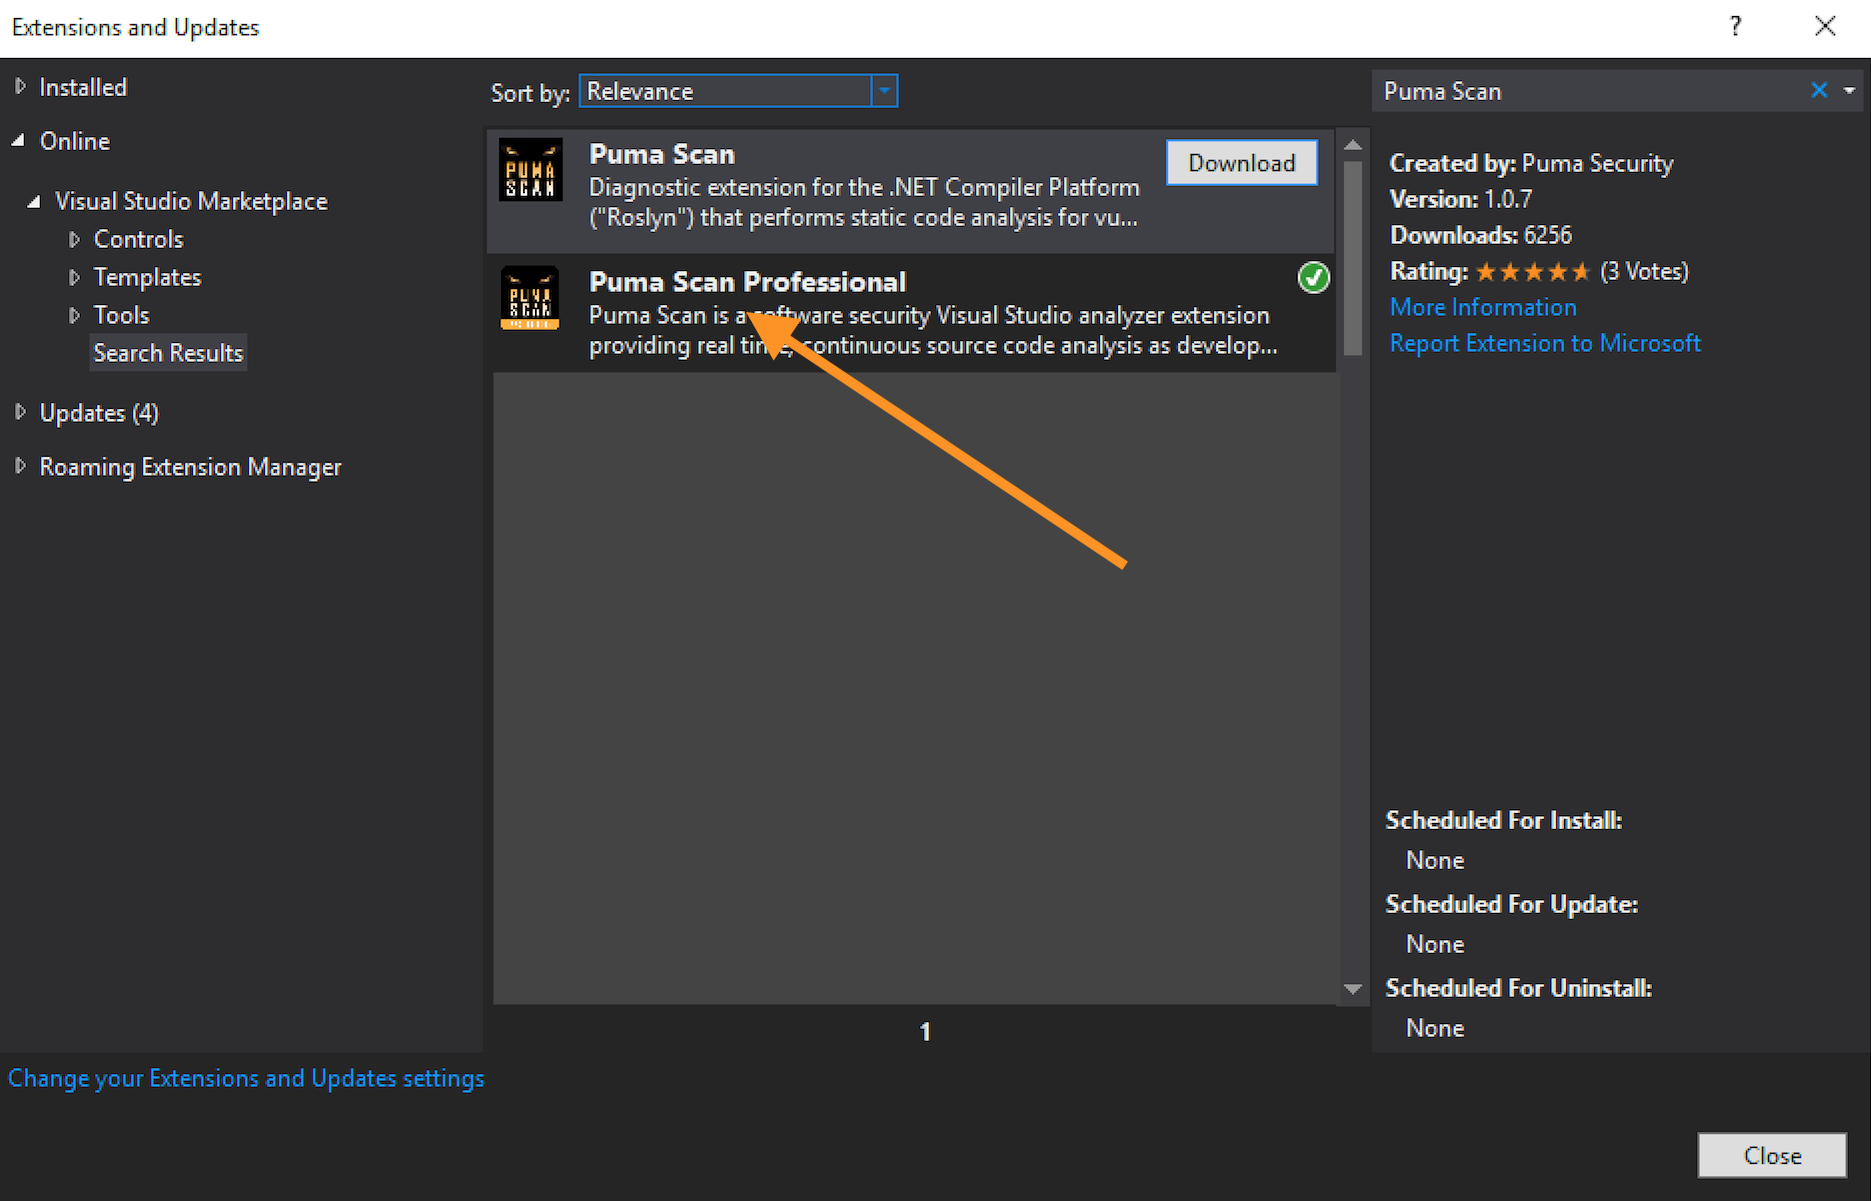
In Visual Studio, open the Extensions > Manage Extensions menu item.
In the Online > Visual Studio Marketplace, search for “Puma Scan” and download the Puma Scan Professional extension.
Close Visual Studio to start the installation wizard.
Follow these steps to activate Puma Scan using a machine that has Internet connectivity and able to reach https://portal.pumascan.com. Otherwise, see the Offline Activation steps below.
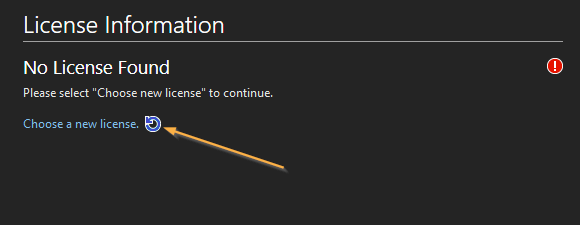
Open Visual Studio and press the Extensions > PumaScan > Update License menu item.

Select Choose new license to begin the license activation wizard.
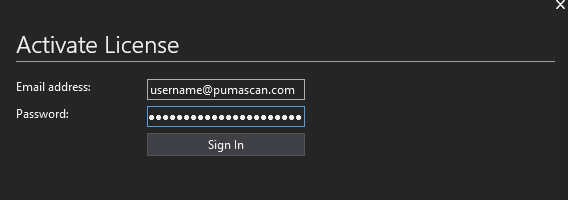
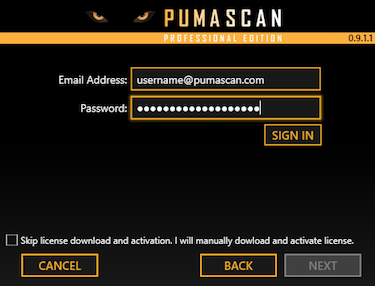
Enter your Puma Scan username and password and press the Sign In button to view your purchased license files.
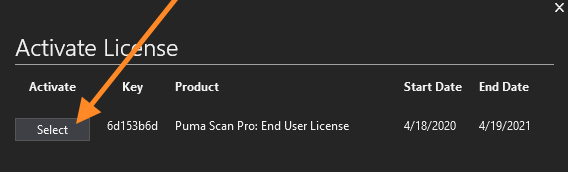
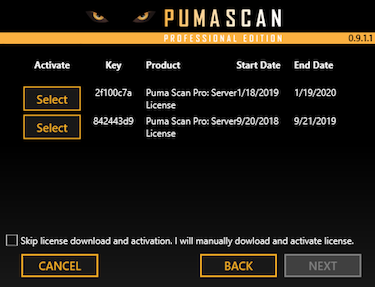
Find your Puma Scan Pro: End User license in the list and press the Select button.
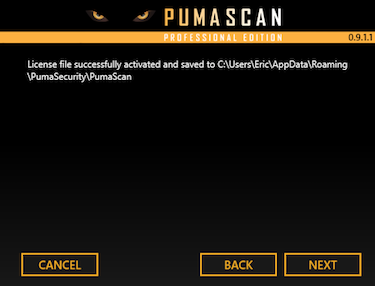
Successful activation will display a message indicating the machine was activated and the license file was downloaded.
Skip the Offline Activation steps if you have already completed the Online Activation. This section is only for manually activating Puma Scan from a machine that does not have Internet connectivity or able to reach https://portal.pumascan.com/.
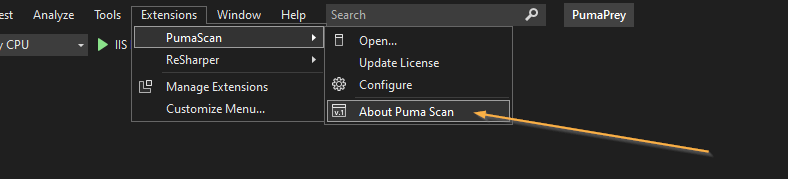
Open Visual Studio and press the Extensions > PumaScan > About Puma Scan menu item.
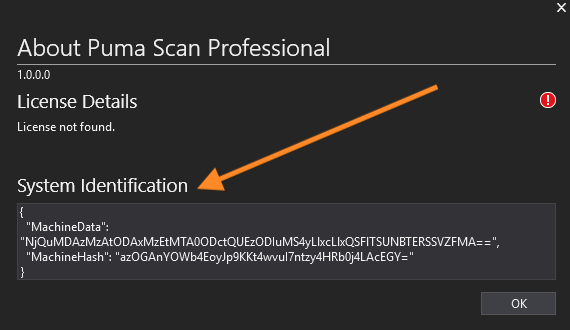
Copy the System Identification details to the clipboard.
Sign In to your pumascan.com account.
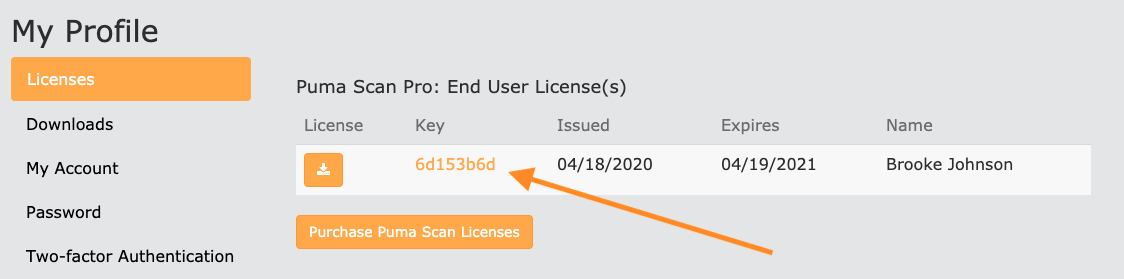
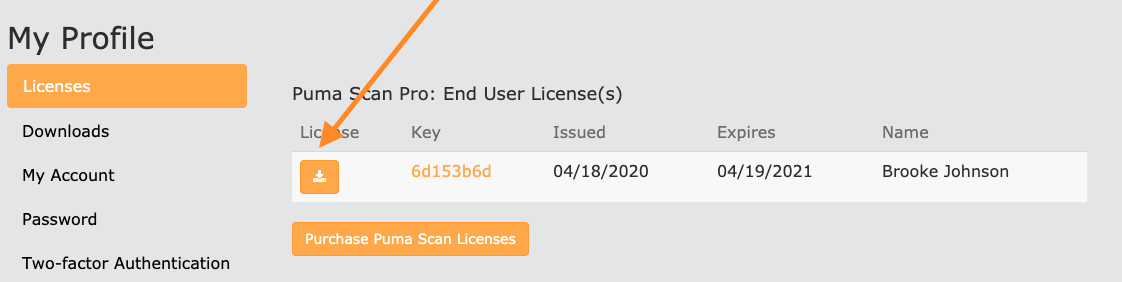
Browse to My Profile and view the license details for the license you would like to activate the new machine on:
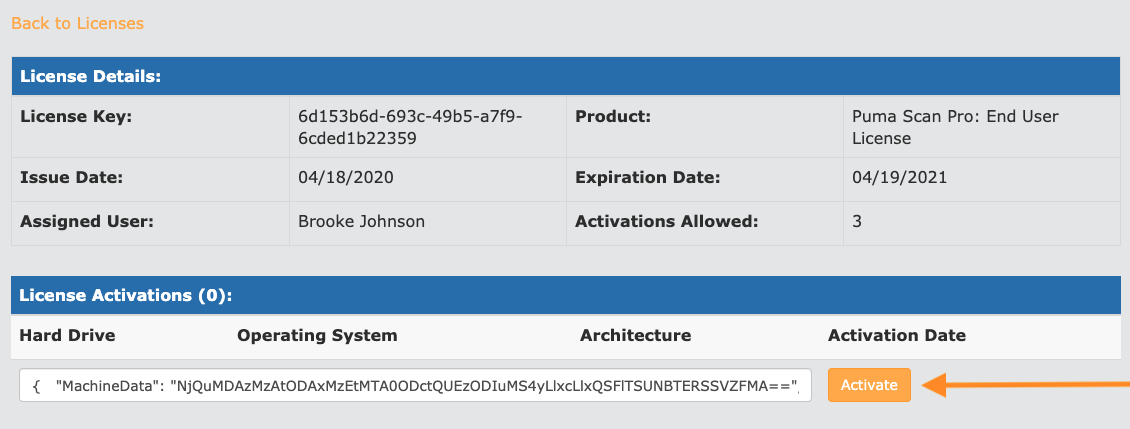
On the license details screen, paste the System Information activation details from clipboard into the text field. Then, press the Activate button.
Press the Back to Licenses link and download the license file.
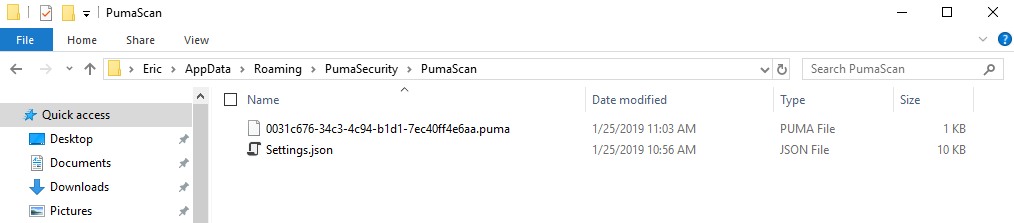
Copy the downloaded license file into the %appdata%\PumaSecurity\PumaScan directory.
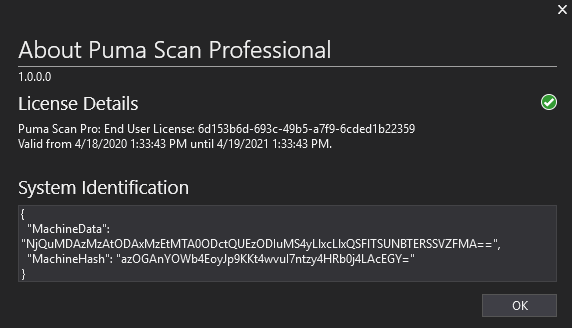
Restart Visual Studio and press the Extensions > PumaScan > About Puma Scan menu item again. Confirm the license is installed and activated:
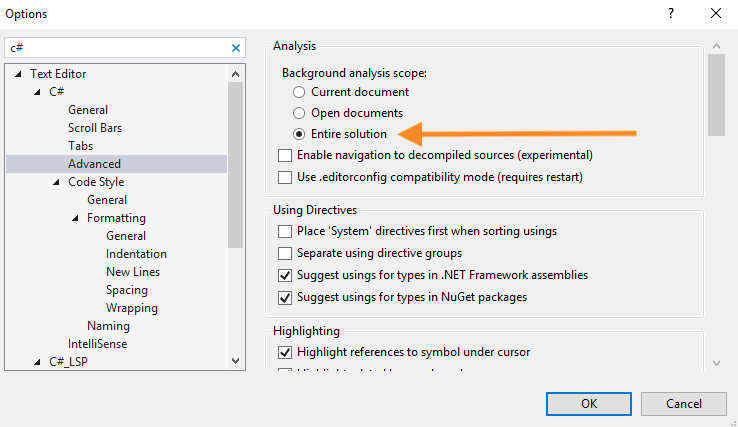
Full solution analysis is disabled by default to improve performance. For the Puma Scan rules to execute against your code when using the Live Code Analysis scan mode, do the following (see image below for details):
Open the Tools > Options dialog box
Choose Text Editor > C# > Advanced
Under Background analysis scope, select the “Entire solution” option and press OK.
Restart Visual Studio to ensure the analyzers are properly registered.
You are now ready to open a solution and scan your code.
To enable Puma’s non-code file analyzers (e.g. configuration and view markup files), you must manually edit each project file (.csproj and .vbproj) and add a new “AdditionalFileItemNames” element to the project’s main “PropertyGroup”.
The following XML snippet shows an example project file’s main “PropertyGroup” with the required “AdditionalFileItemNames” element adding all content files for analysis.
<?xml version="1.0" encoding="utf-8"?>
<Project ToolsVersion="12.0" DefaultTargets="Build" xmlns="http://schemas.microsoft.com/developer/msbuild/2003">
<Import Project="$(MSBuildExtensionsPath)\$(MSBuildToolsVersion)\Microsoft.Common.props" Condition="Exists('$(MSBuildExtensionsPath)\$(MSBuildToolsVersion)\Microsoft.Common.props')" />
<PropertyGroup>
    <Configuration Condition=" '$(Configuration)' == '' ">Debug</Configuration>
    <Platform Condition=" '$(Platform)' == '' ">AnyCPU</Platform>
    ...
    <!-- ADD THE FOLLOWING NEW ELEMENT -->
    <AdditionalFileItemNames>$(AdditionalFileItemNames);Content</AdditionalFileItemNames>
</PropertyGroup>
You must do this for every project (.csproj, .vbproj) file in a solution.
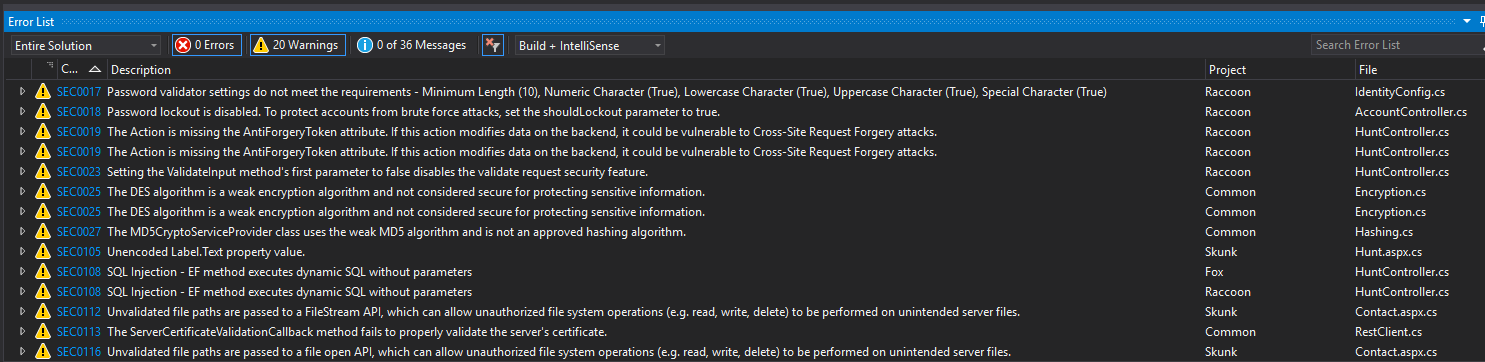
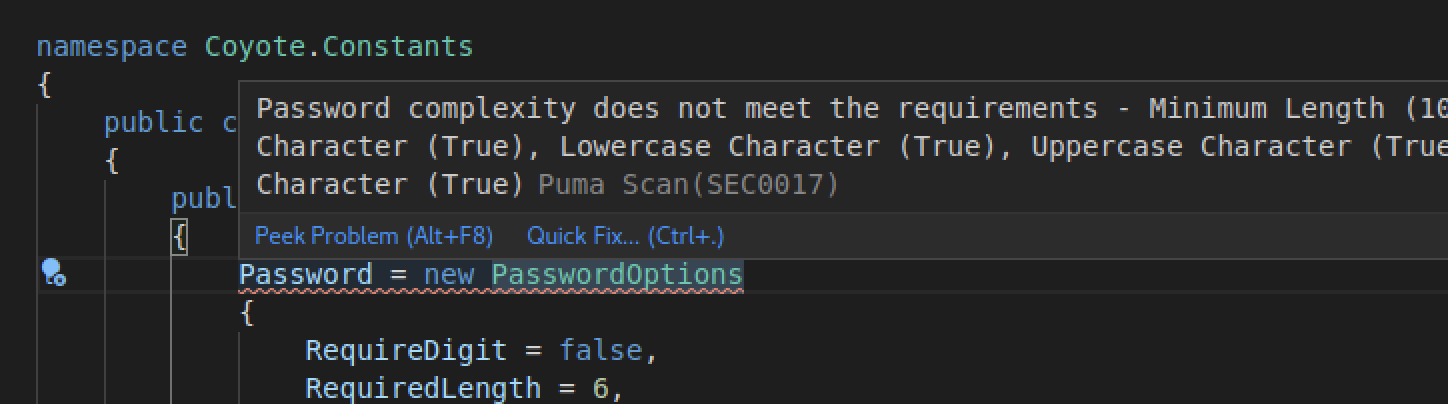
To verify your installation is successful, feel free to scan our Puma Prey vulnerable application. This source code contains a number of vulnerabilities that will cause Puma Scan analysis results to appear in the Error List Window.
Clone the puma-prey repository to your local development machine, as shown in the following git clone command:
git clone https://github.com/pumasecurity/puma-prey.git
In Visual Studio, open the PumaPrey.sln file.
Wait a few moments for Puma Scan to display vulnerabilities in the Error List window. See the following image for an example.
After Puma Scan installs, the roaming AppData PumaScan directory will contain a Settings.json file. The Settings.json file contains all of the configuration options for controlling how Puma Scan runs. During the first code scan, the default Settings are copied into a new .pumafile located in the application’s root directory. See the User Guide for details on configuring Puma Scan.
You must restart Visual Studio after modifying the Settings.json file for configuration changes to take effect.
Installation Guide
The Puma Scan End User Edition allows individual users to scan their .NET C# code for vulnerabilities inside of VS Code. Puma Scan's security analyzers are installed through a VS Code Extension, which is activated by purchasing a license file from pumascan.com. End User license files can be activated on up to three (3) workstations owned by a single user.
Create an account (if you do not have one) at pumascan.com
Sign In to pumascan.com
Press the Buy Now button to purchase a Puma Scan Pro: End User License
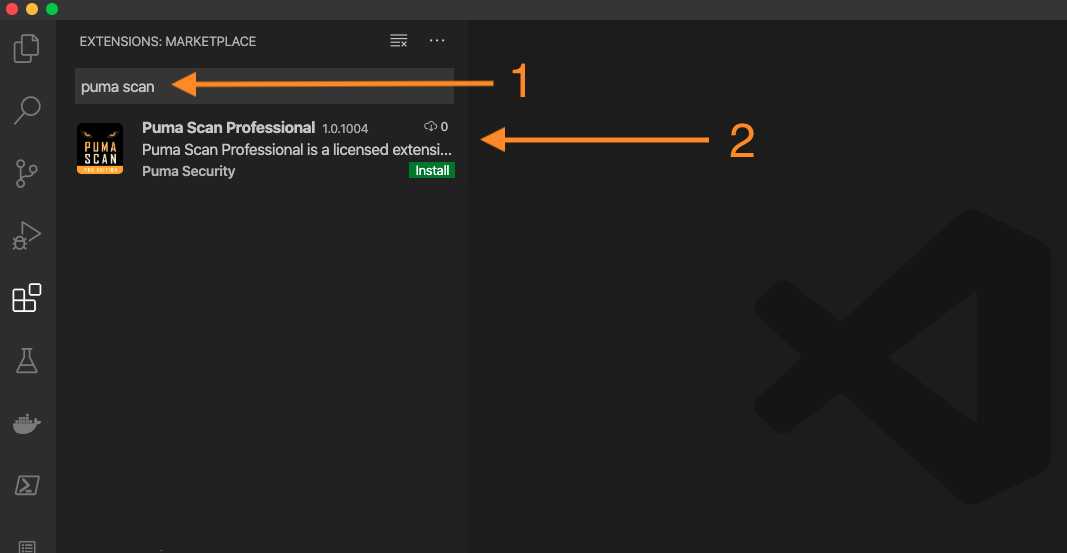
In VSCode Studio, select the Extensions icon in the left menu.
In the Search Extensions in Marketplace field, enter “Puma Scan” and press the Install button.
Follow these steps to activate Puma Scan using a machine that has Internet connectivity and able to reach https://portal.pumascan.com.
Open VS Code Studio and use the View -> Command Palette (Windows: Ctrl + Shift + P, L) option to Show All Commands.

Run the PumaScan: Activate License command to start the activation process.
Enter your Puma Scan username press Enter.

Enter your Puma Scan password and press Enter.

Select your Puma Scan End User license and press Enter.

Successful activation will display a message indicating the machine was activated and the license file was downloaded.
To enable Puma’s non-code file analyzers (e.g. configuration and view markup files), you must manually edit each project file (.csproj) and add a new AdditionalFileItemNames element to the project’s main “PropertyGroup”.
The following XML snippet shows an example project file’s main “PropertyGroup” with the required “AdditionalFileItemNames” element adding all content files for analysis.
<PropertyGroup>
  <TargetFramework>netcoreapp3.1</TargetFramework>
  <AspNetCoreHostingModel>InProcess</AspNetCoreHostingModel>
  <!-- ADD THE FOLLOWING NEW ELEMENT -->
  <AdditionalFileItemNames>$(AdditionalFileItemNames);Content</AdditionalFileItemNames>
</PropertyGroup>
You must do this for every project (.csproj) file in a folder or workspace.
To verify your installation is successful, feel free to scan our Puma Prey vulnerable application. This source code contains a number of vulnerabilities that will cause Puma Scan analysis results to appear in the Error List Window.
Clone the puma-prey repository to your local development machine, as shown in the following git clone command:
git clone https://github.com/pumasecurity/puma-prey.git
In VS Code, open the puma-prey source code directory.
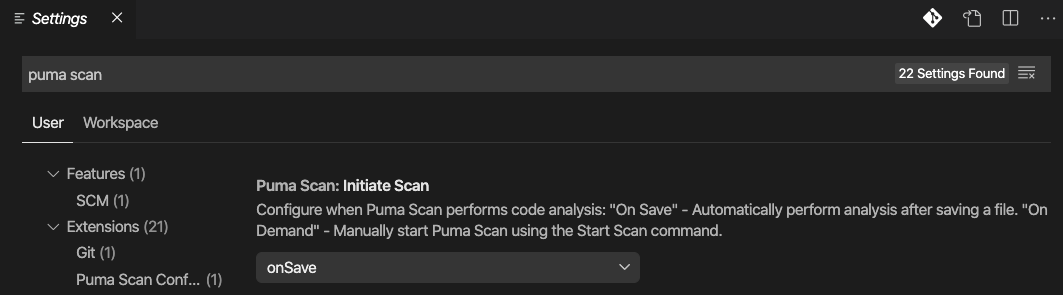
Configure Puma Scan’s Initiate Scan setting, which supports two different scanning modes:
On Demand: Manually scan the source code using the Command Palette’s PumaScan: Start Scan command.
On Save: Automatically scans the source code and displays the results in the Problems window after saving a document. This is the default setting.
After saving a file or starting an On Demand scan, the Puma Scan results will display in the VS Code Problems window.
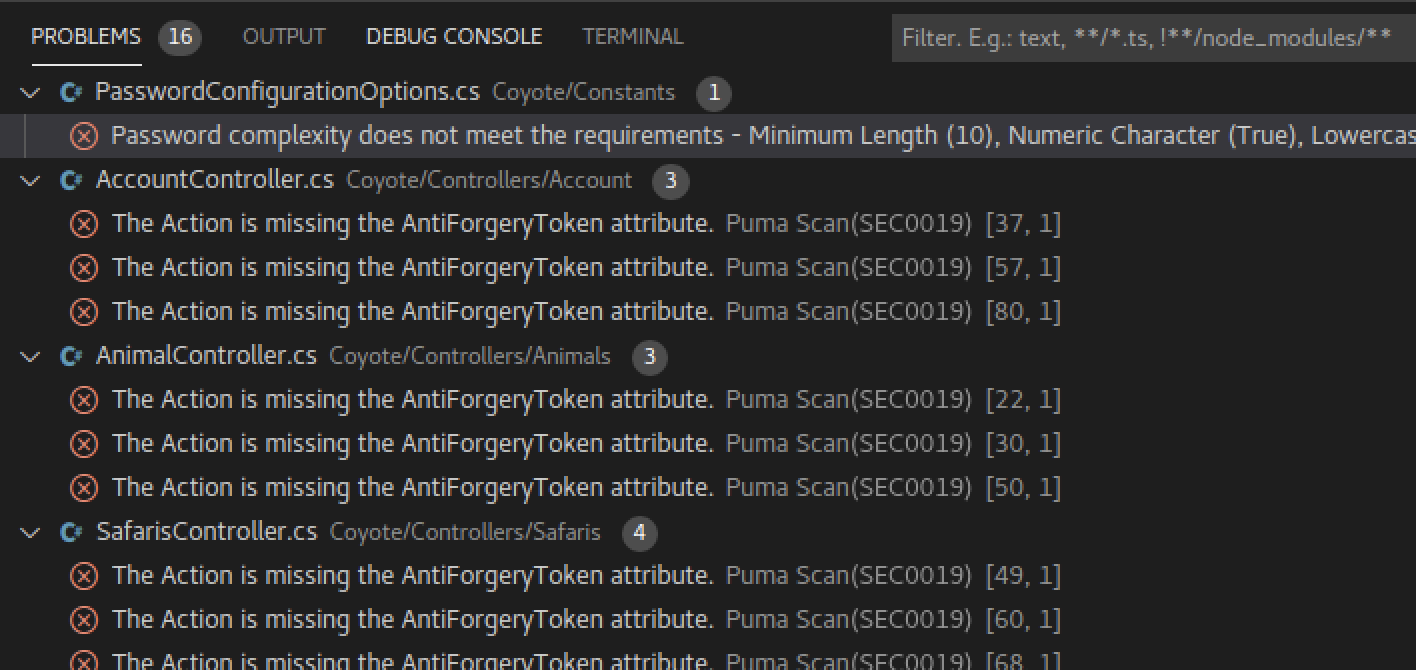
Double click on a Puma Scan warning in the Problems window to navigate to the file and view more details.
Export the results to a HTML, JSON, or CSV formatted report using the Command Palette’s PumaScan: Export Report command.
After Puma Scan installs, the local application data directory (Windows: %appdata%\PumaSecurity\PumaScan, Mac & Linux: ~/.config/PumaSecurity/PumaScan) will contain a Settings.json file. The Settings.json file contains all of the configuration options for controlling how Puma Scan runs. During the first code scan, the default Settings are copied into a new .pumafile located in the application’s root directory. See the User Guide for details on configuring Puma Scan.
Installation Guide
The Puma Scan Server Edition allows development teams to scan their .NET C# code for vulnerabilities in their build pipelines. Puma Scan's security analyzers are installed on the build server, which is activated by purchasing a server edition license file from pumascan.com. Server Edition license files can be activated on up to five (5) build agents. Additional build agents can be purchased in packages of five (5) to meet your needs.
Create an account (if you do not have one) at pumascan.com
Sign In to pumascan.com Portal
Press the Buy Now button to purchase a Puma Scan Pro: Server License
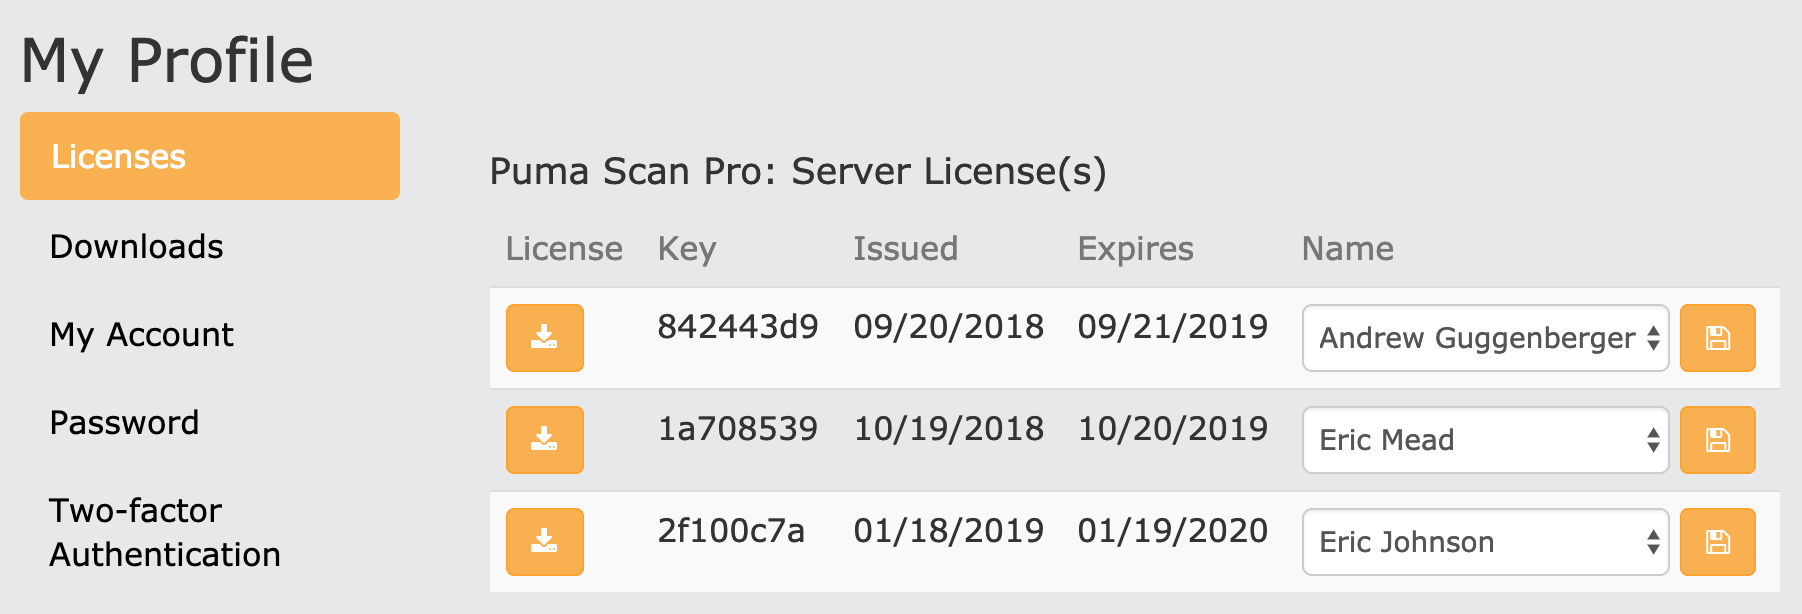
Browse to the My Profile screen to confirm your license details.
Sign In to pumascan.com
Browse to the My Profile screen
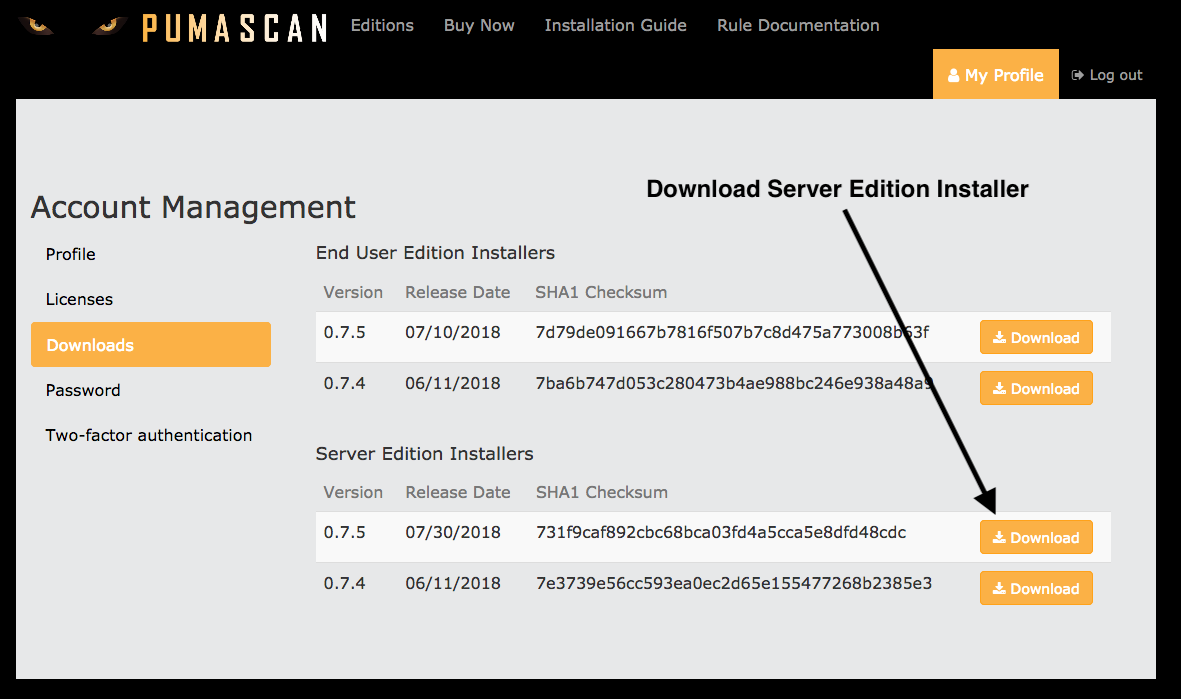
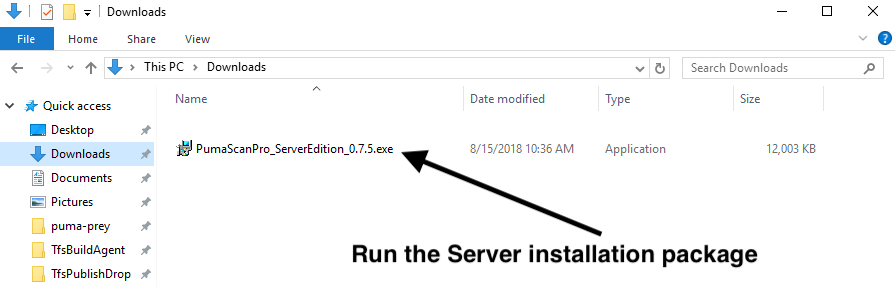
Press the Downloads tab to view and download the latest installer package
The Puma Scan Server Edition currently only supports Windows build agents. The installer will automatically install the following packages during installation if they do not exist:
The installer will prompt the user to manually install the following packages and the server edition will not run correctly until the packages exist:
To install the Build Tools, browse to the Downloads For Visual Studio screen.
In the All Downloads list, locate the Build Tools for Visual Studio 2017 item and press the download button.
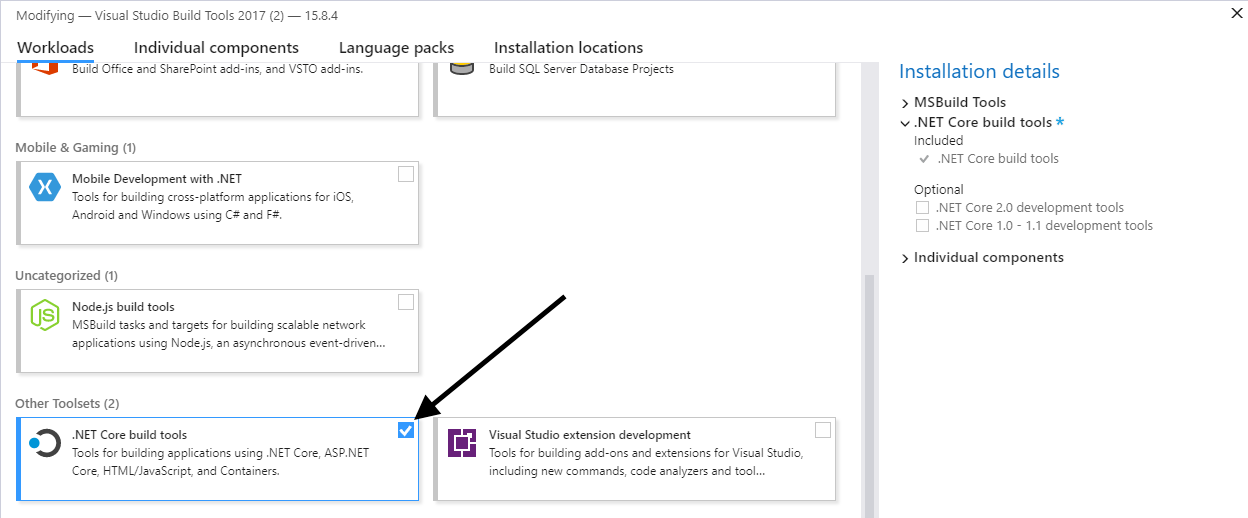
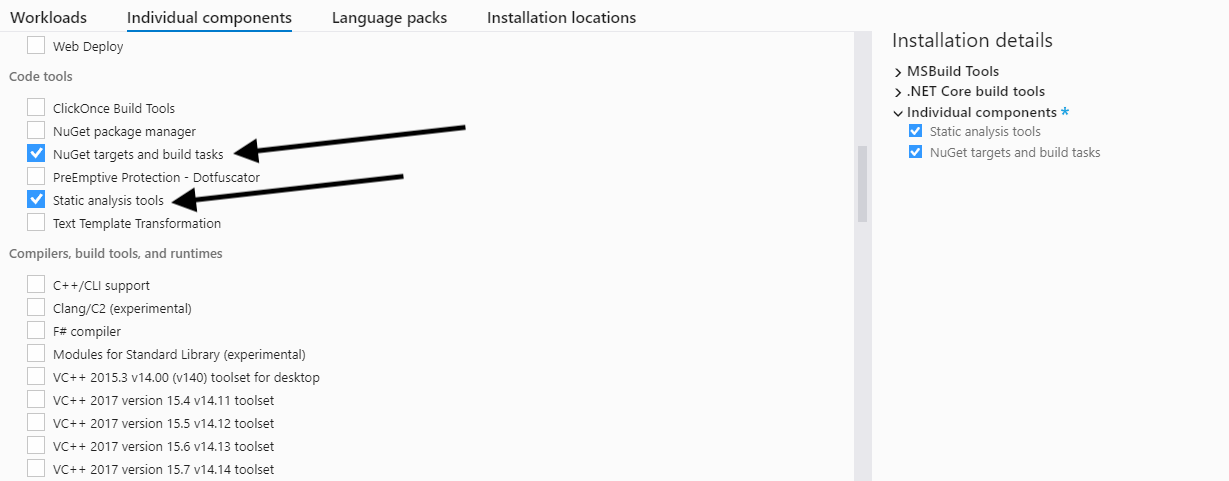
Run the Build Tools installer and select the following options:


Installation Guide
The Puma Scan Cloud CI Edition allows the Puma Scan analyzers to be run inside GitHub Actions and GitLab CI pipelines. DevOps teams can use the GitHub Action or GitLab CI Component to analyze their code. Cloud CI Standard Edition licenses are priced by the number of pipelines starting at twenty (20). Alternatively, the Cloud CI Unlimited license allows unlimited scanning within a single GitHub or GitLab organization.
Create a Puma Scan Account (if you do not already have one).
Sign In to pumascan.com.
Press the Buy Now button and purchase a Puma Scan Pro: Cloud CI License.
Browse to the My Profile screen to view your license(s).
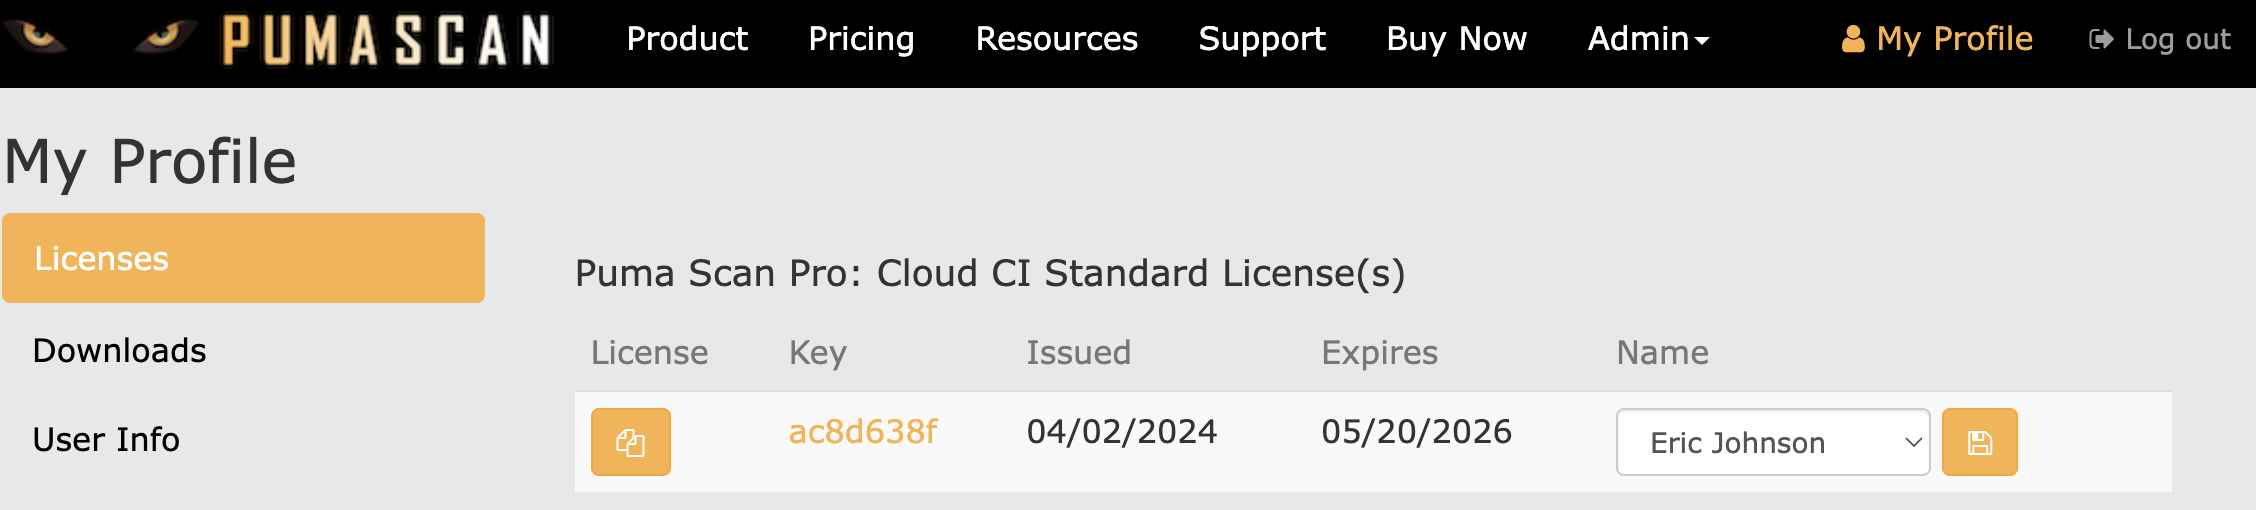
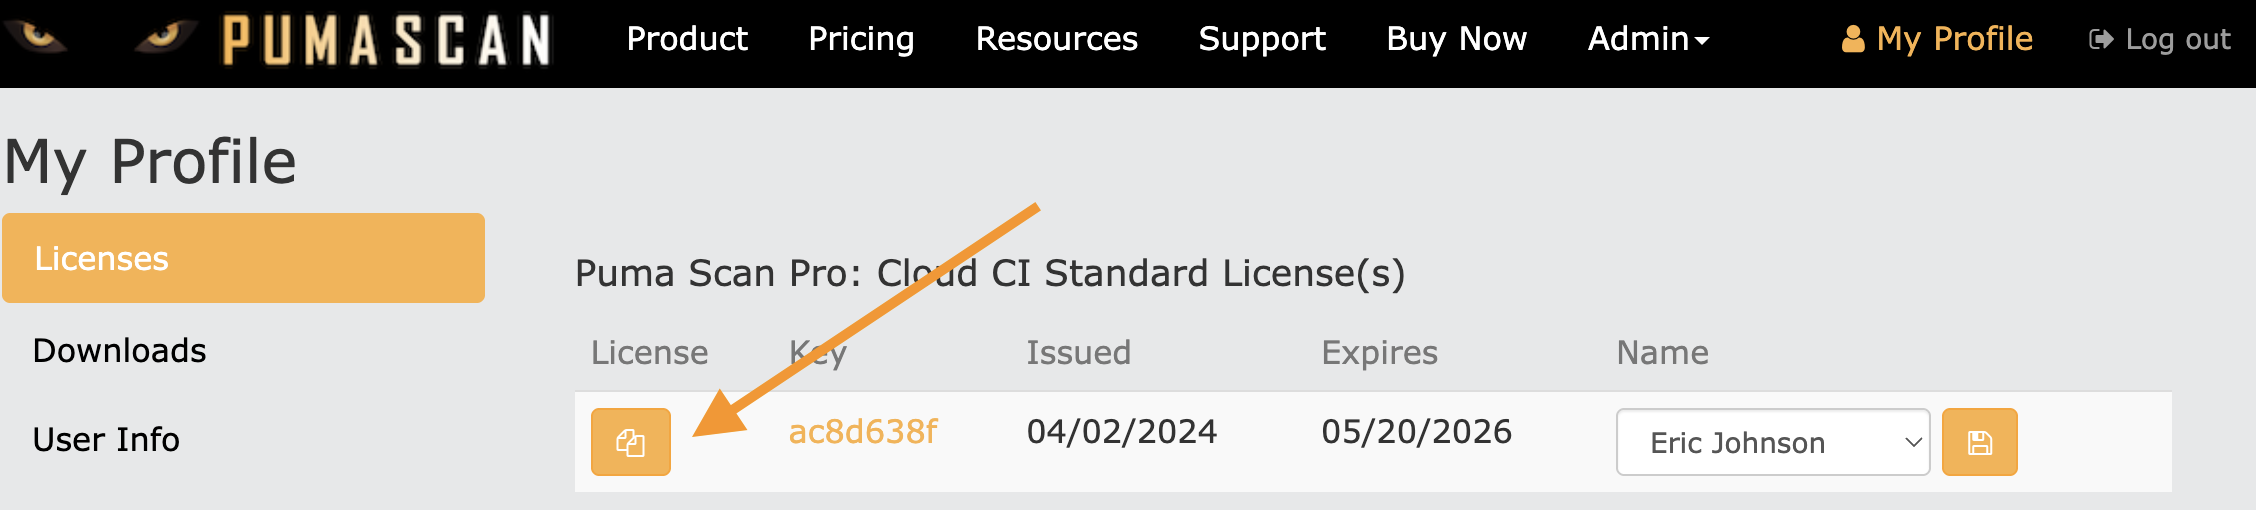
Sign In to pumascan.com and copy the Cloud CI license information to the clipboard by pressing the Copy button.
Sign in to your GitHub organization and browse to the Settings.
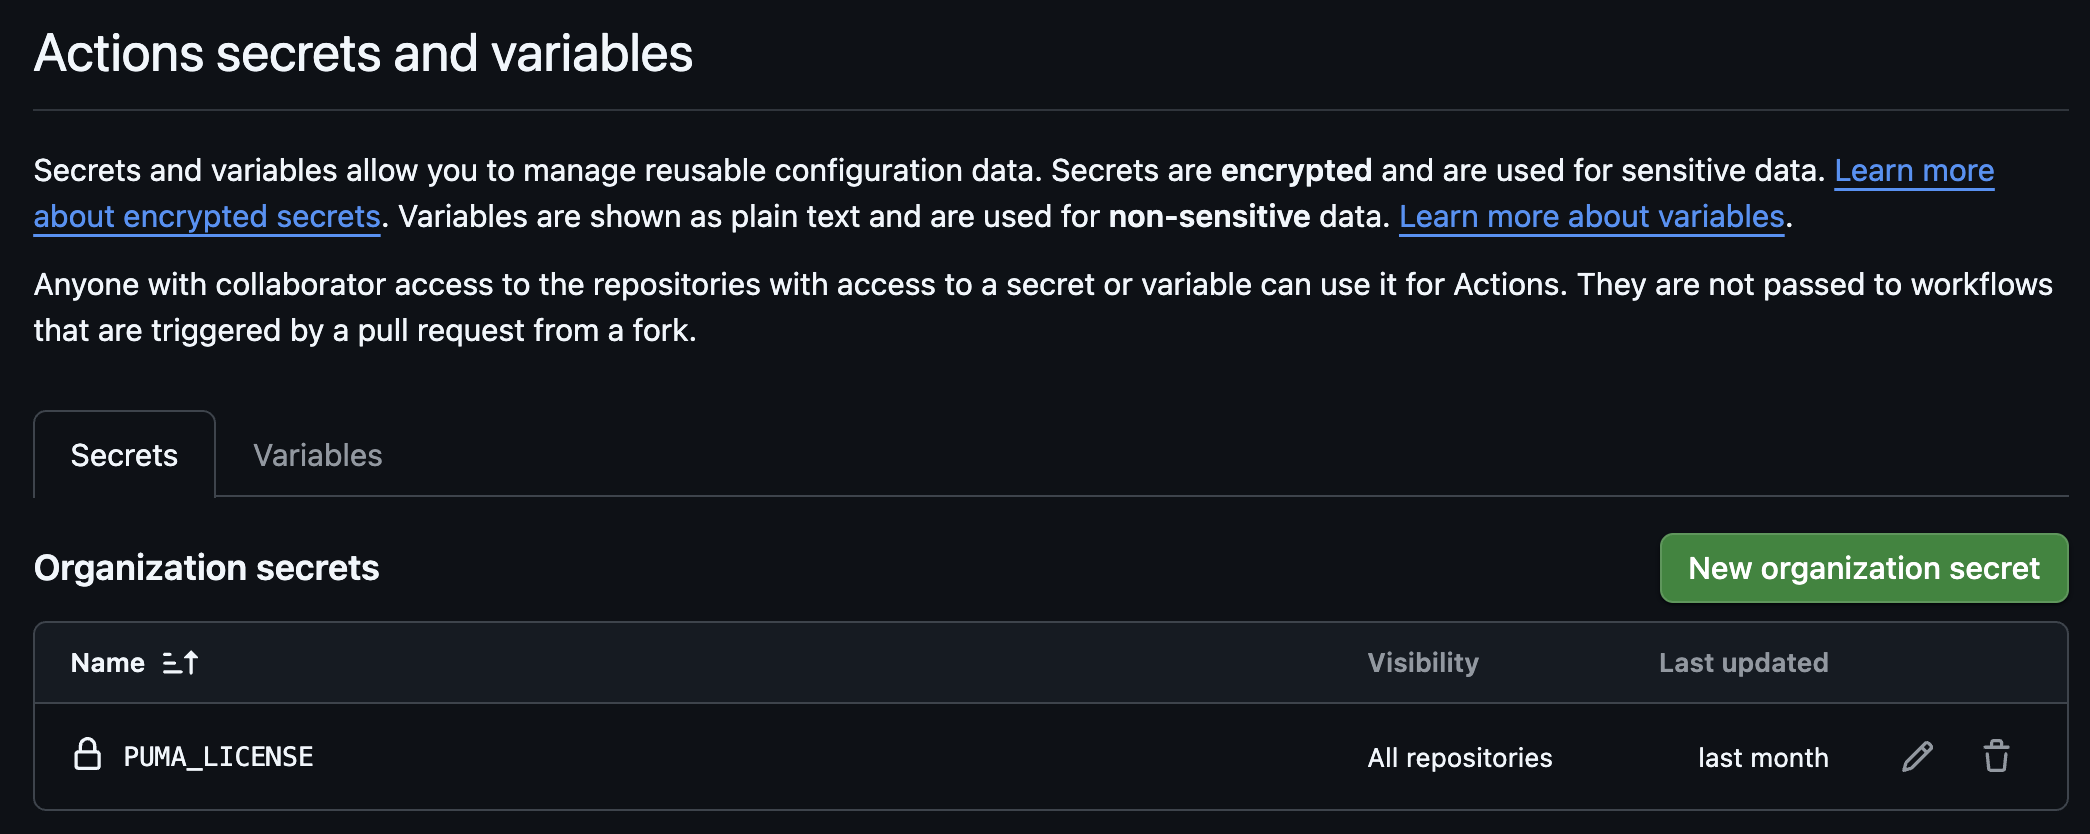
Use the left navigation menu to browse to the Secrets and Variables > Actions menu item.
Press the New organization secrets button to add a new secret for the Puma Scan license.
In the Name field, enter PUMA_LICENSE.
In the Value field, paste the license data you copied to the clipboard from the Puma Scan portal.
Press the Add Secret button to save the new secret.
Sign in to your GitLab organization and browse to the Settings.
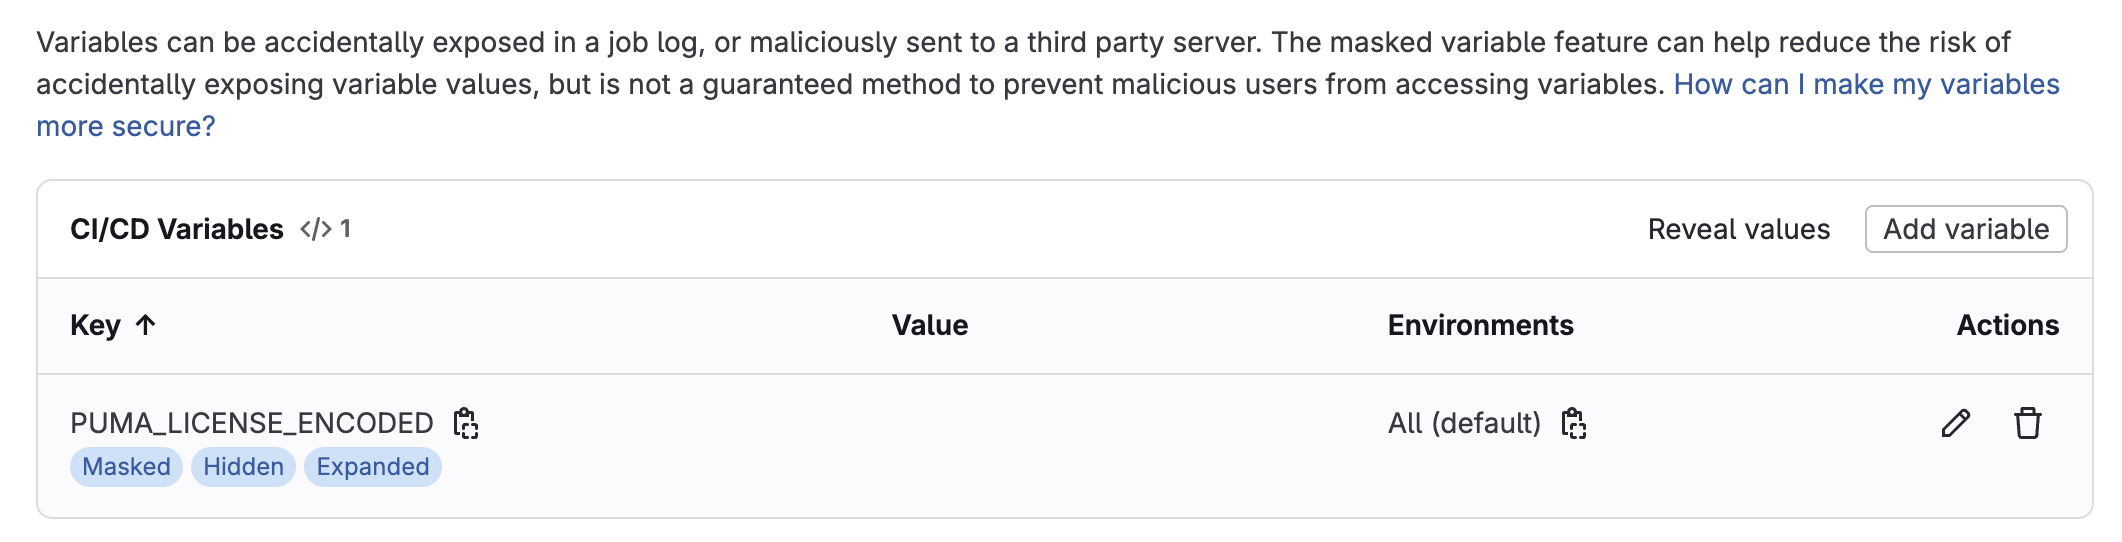
Select the CI/CD menu item in the left navigation menu and expand the Variables section.
Press the Add Variable button to add a new variable for the Puma Scan license.
Select the Masked and hidden option to protect the license variable value.
In the Flags section, you may want to uncheck the Protect variable option if you are going to run Puma Scan on feature branches as a merge request check. If Puma Scan is only going to be run on release branches (e.g., main), then you can leave this option selected.
In the Flags section, you can leave the Expand variable reference option selected.
In the Key field, enter PUMA_LICENSE_ENCODED.
GitLab CI does not allow special characters (such as JSON objects) to be stored directly in a variable value. You will need to base64 encode the Cloud CI license data on your clipboard using the Terminal and a command similar to the following: base64 <<< "PASTE_YOUR_LICENSE"
In the Value field, paste the base64 encoded license data.
Press the Add variable button to save the GitLab CI variable.
Installation Guide
The Puma Scan Azure DevOps Edition allows the Puma Scan analyzers to be run inside cloud-hosted Azure DevOps pipelines. DevOps teams install the Puma Scan Azure DevOps extension, add the build task to a pipeline, and purchase an Azure DevOps license from pumascan.com. Azure DevOps Standard Edition licenses are priced by the number of pipelines starting at twenty (20). Alternatively, the Azure DevOps Unlimited license allows unlimited scanning within a single Azure DevOps organization.
Create a Puma Scan Account (if you do not already have one).
Sign In to pumascan.com.
Press the Buy Now button and purchase a Puma Scan Pro: Azure DevOps License.
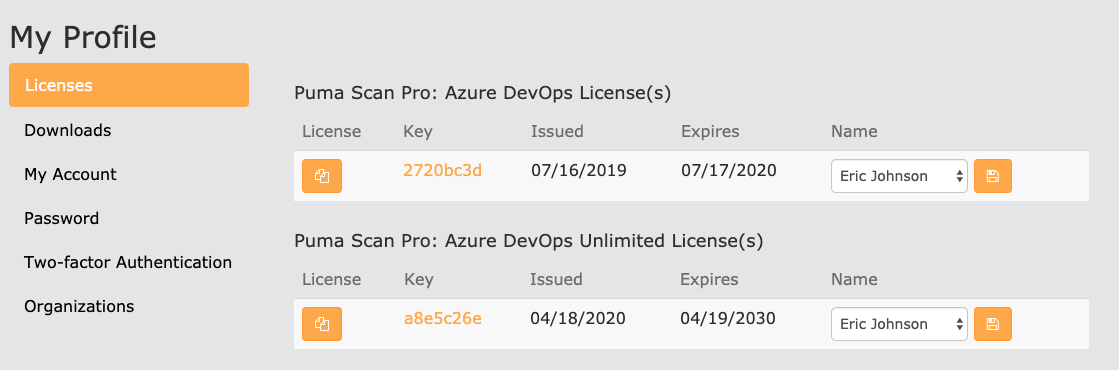
Browse to the My Profile screen to view your license(s).
Open a browser and sign in to your Azure DevOps organization.
Open the Puma Scan Professional Azure DevOps extension and press the Get button.
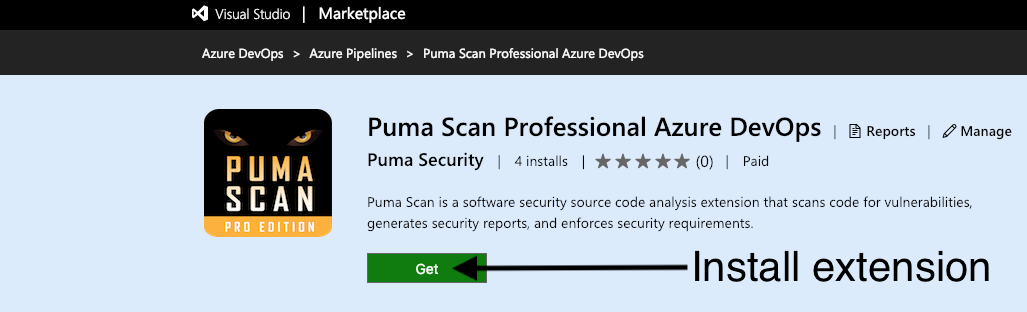
Confirm the installation by selecting the appropriate organization and pressing the Install button.
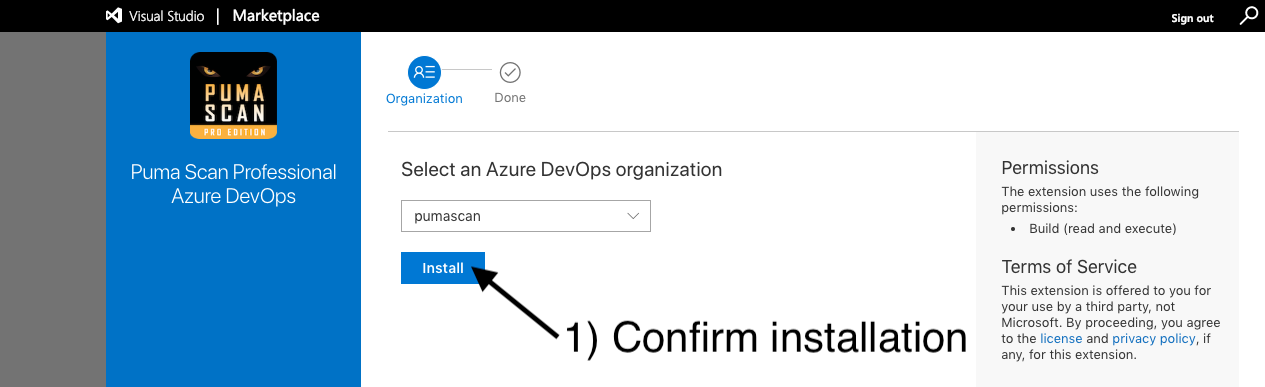
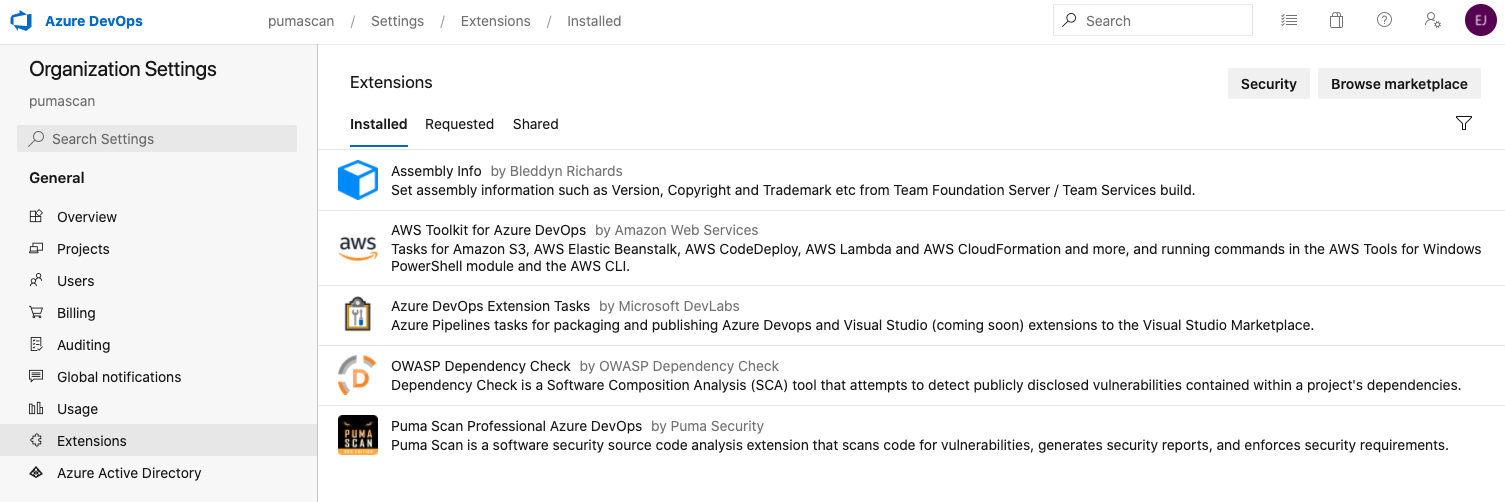
Use the Proceed to organization button and view the Organization settings > Extensions screen again to confirm the Puma Scan extension was successfully installed.
Azure DevOps Unlimited Licenses allow unlimited scanning with a single Azure DevOps organization. To activate the Unlimited license, following these steps. Otherwise, follow the Activate Azure DevOps Standard License section below.
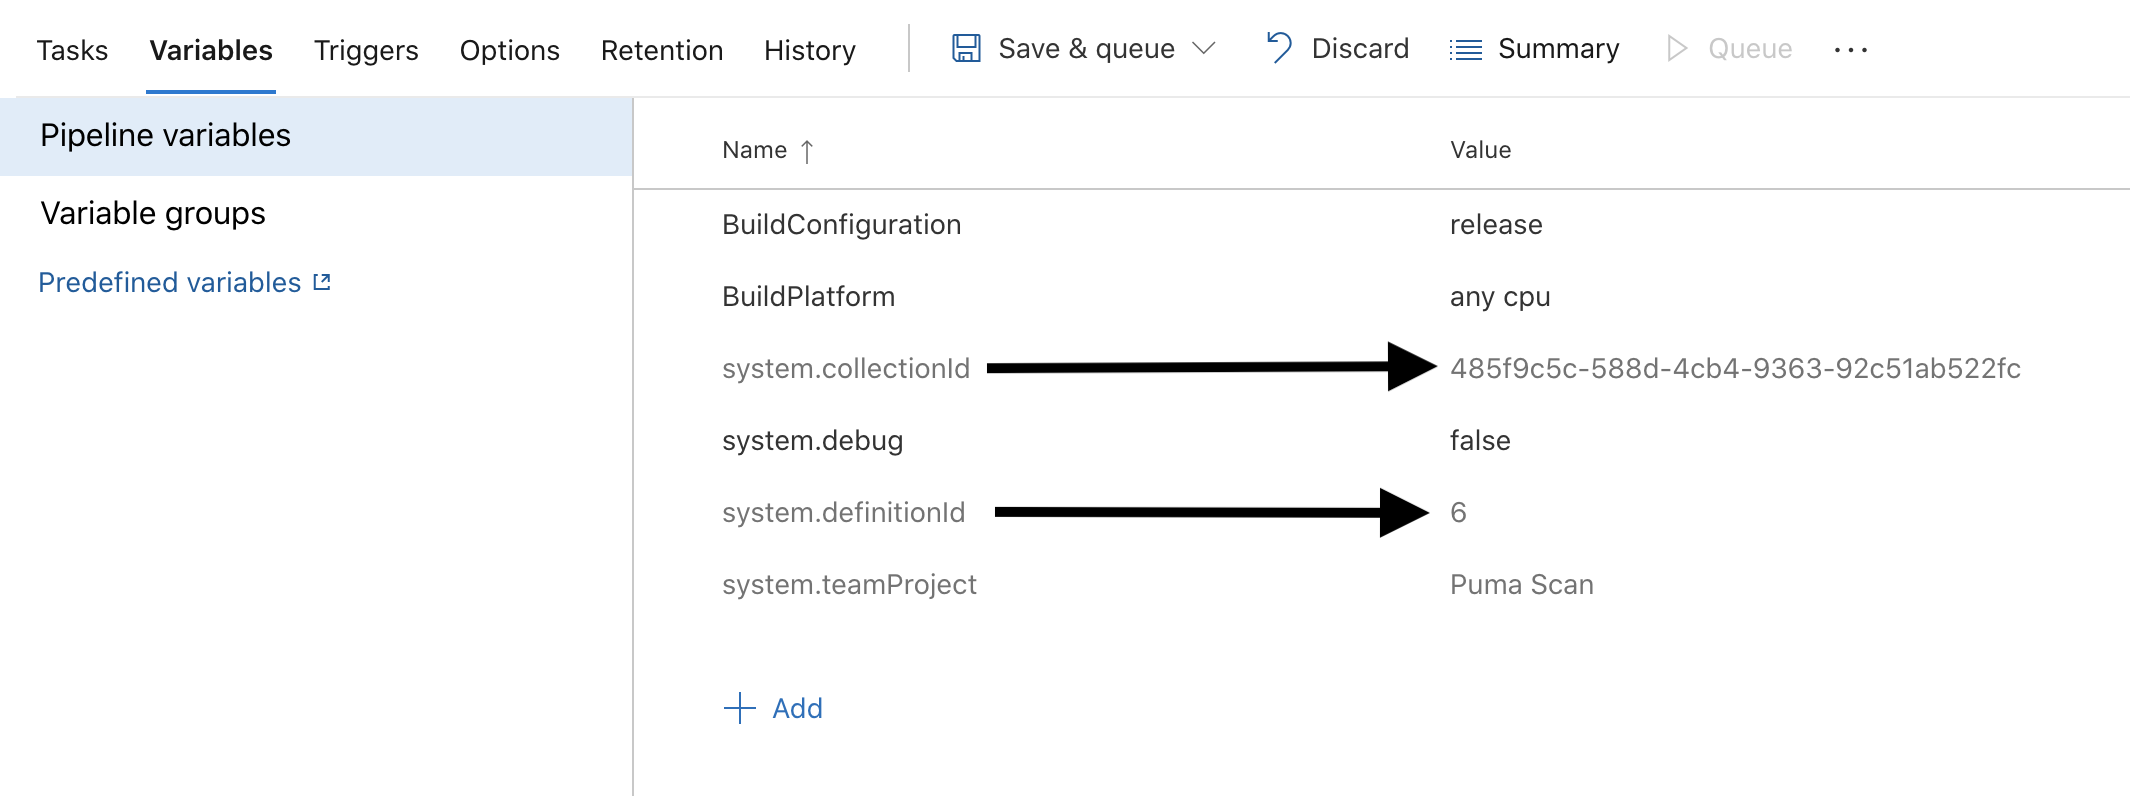
Start by finding your organization id (also known as a collection id). To do this, open any build pipeline in your organization and view the pipeline variables.
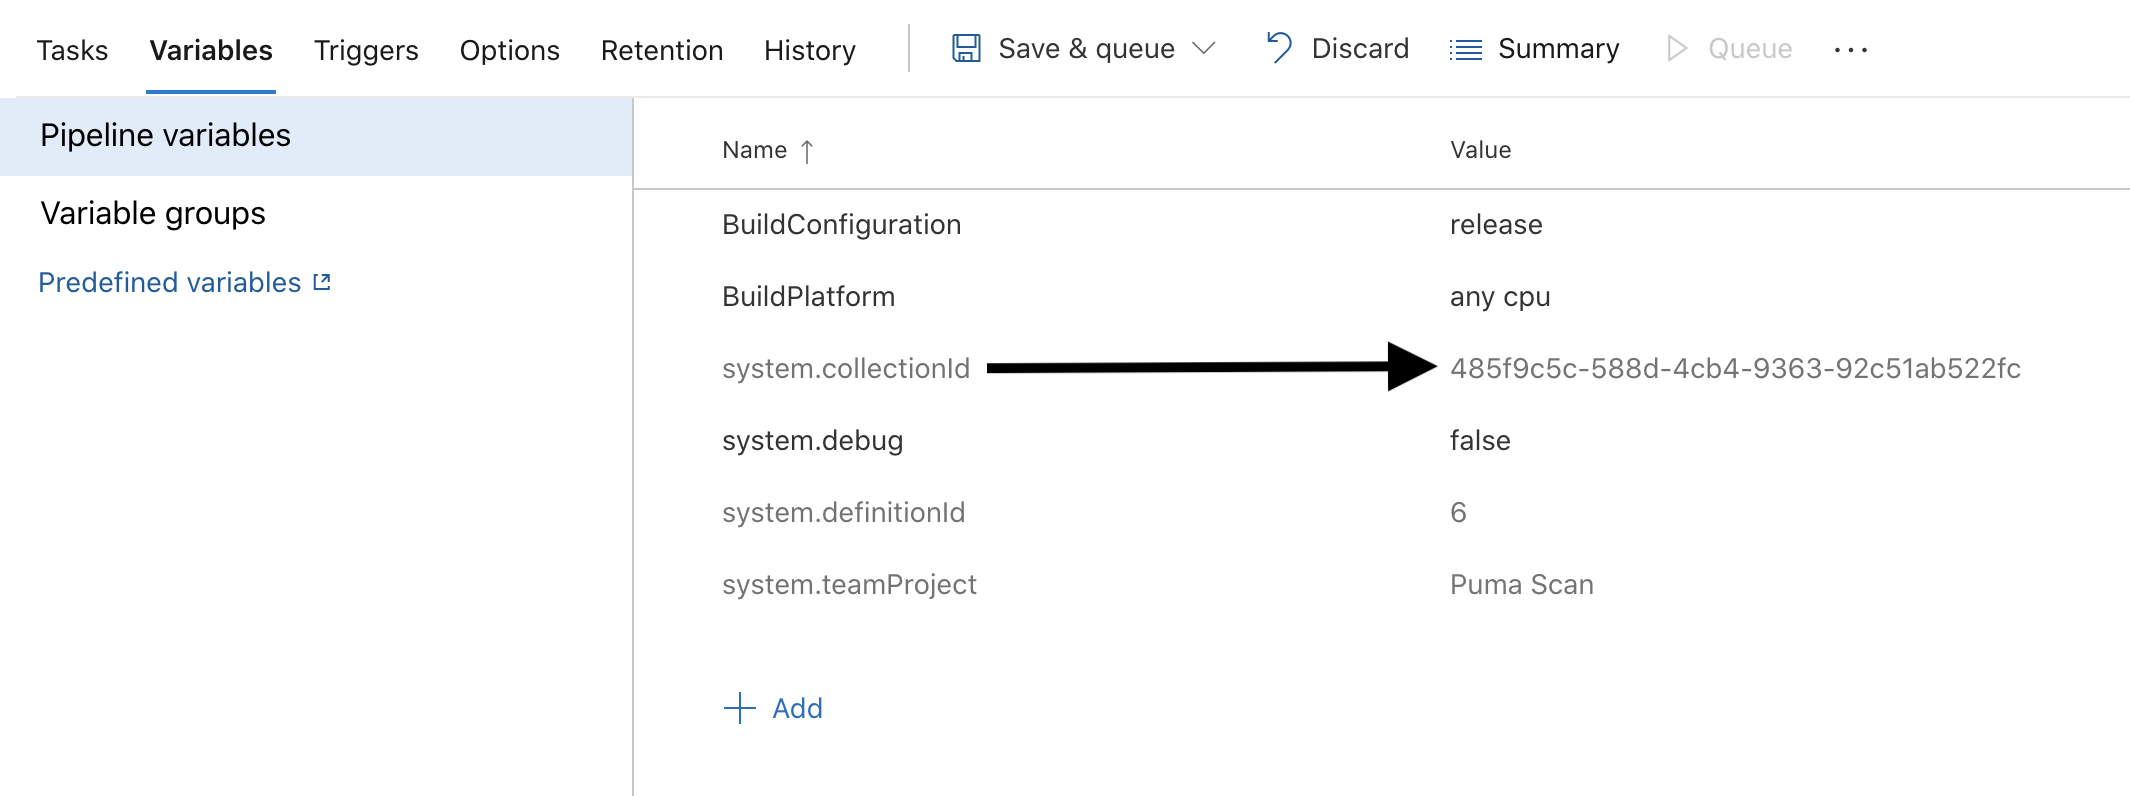
Copy the system.collection id to the clipboard.
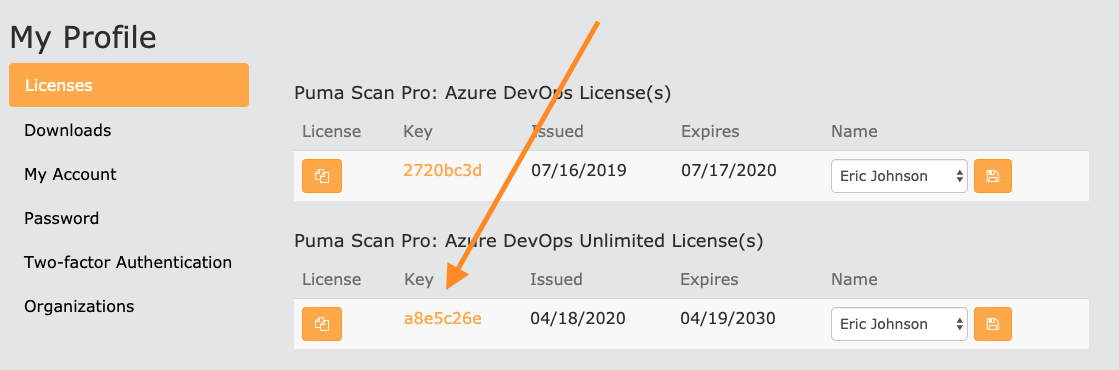
Back in the browser, view the license details for your Azure DevOps Unlimited license.
Enter the Collection id value from your clipboard and press the “Activate” button.
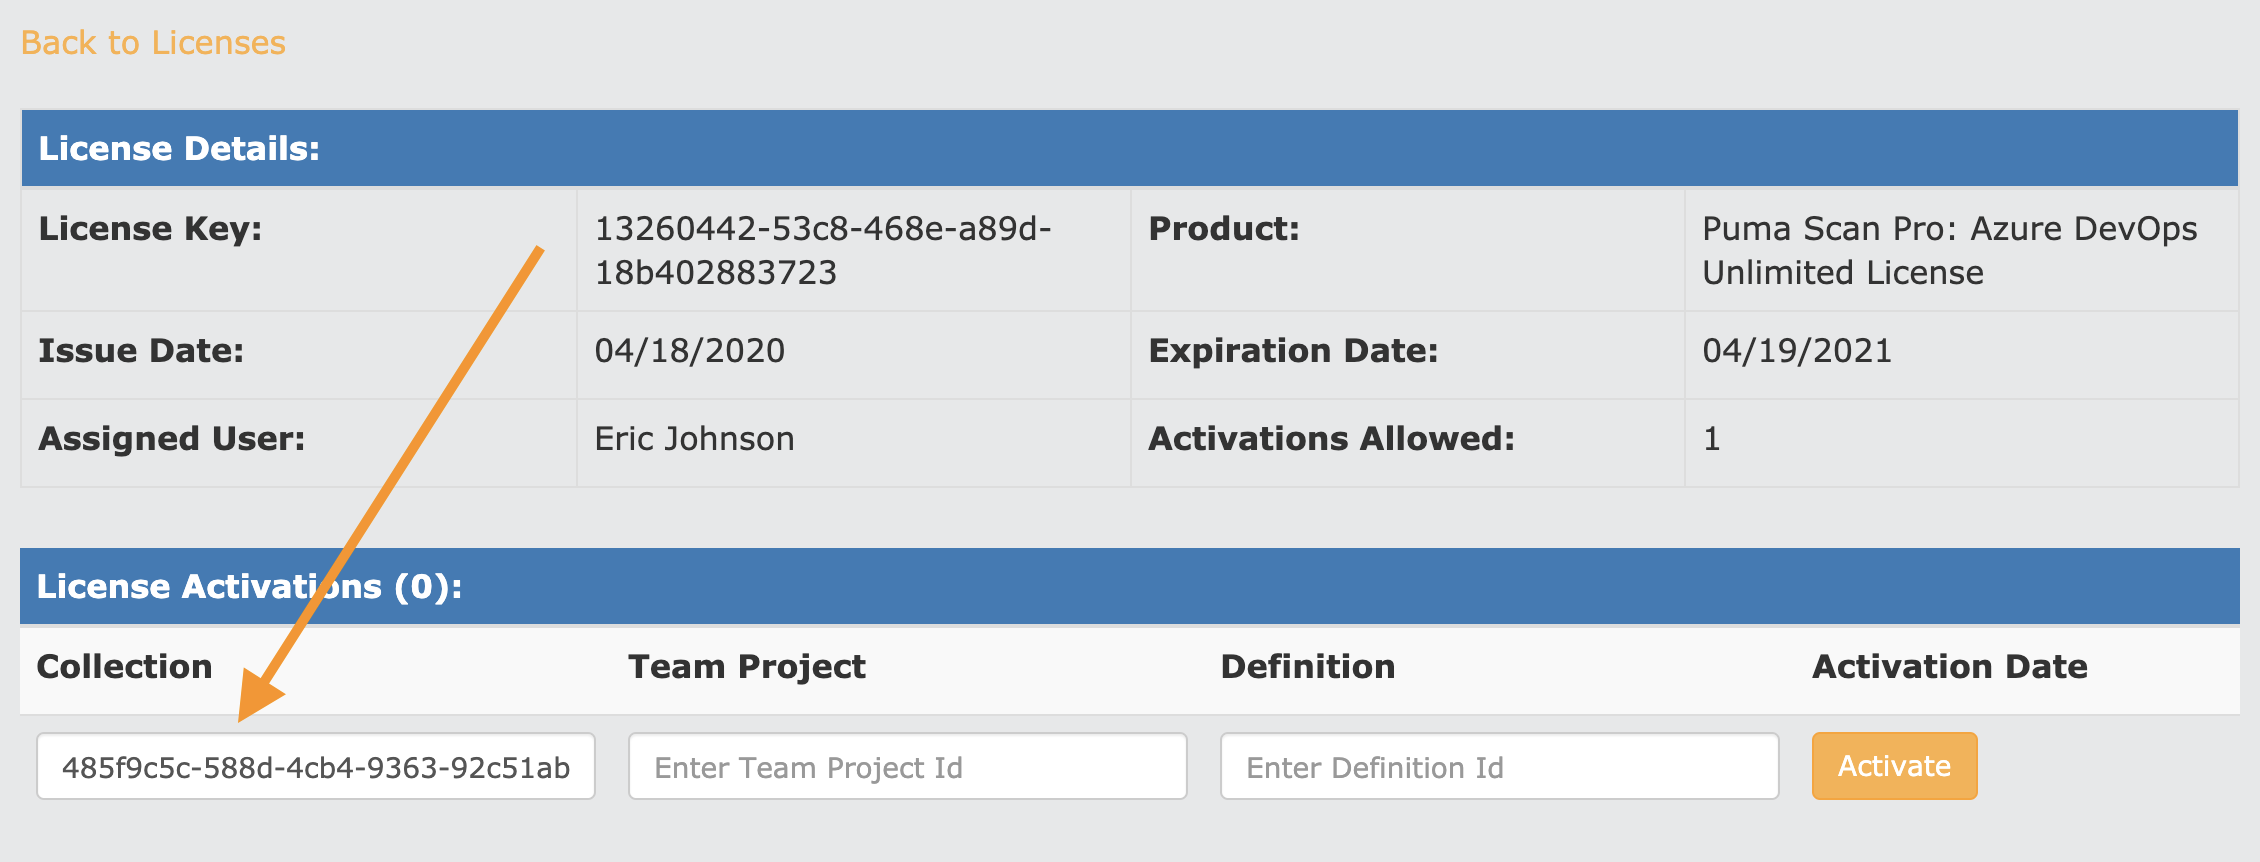
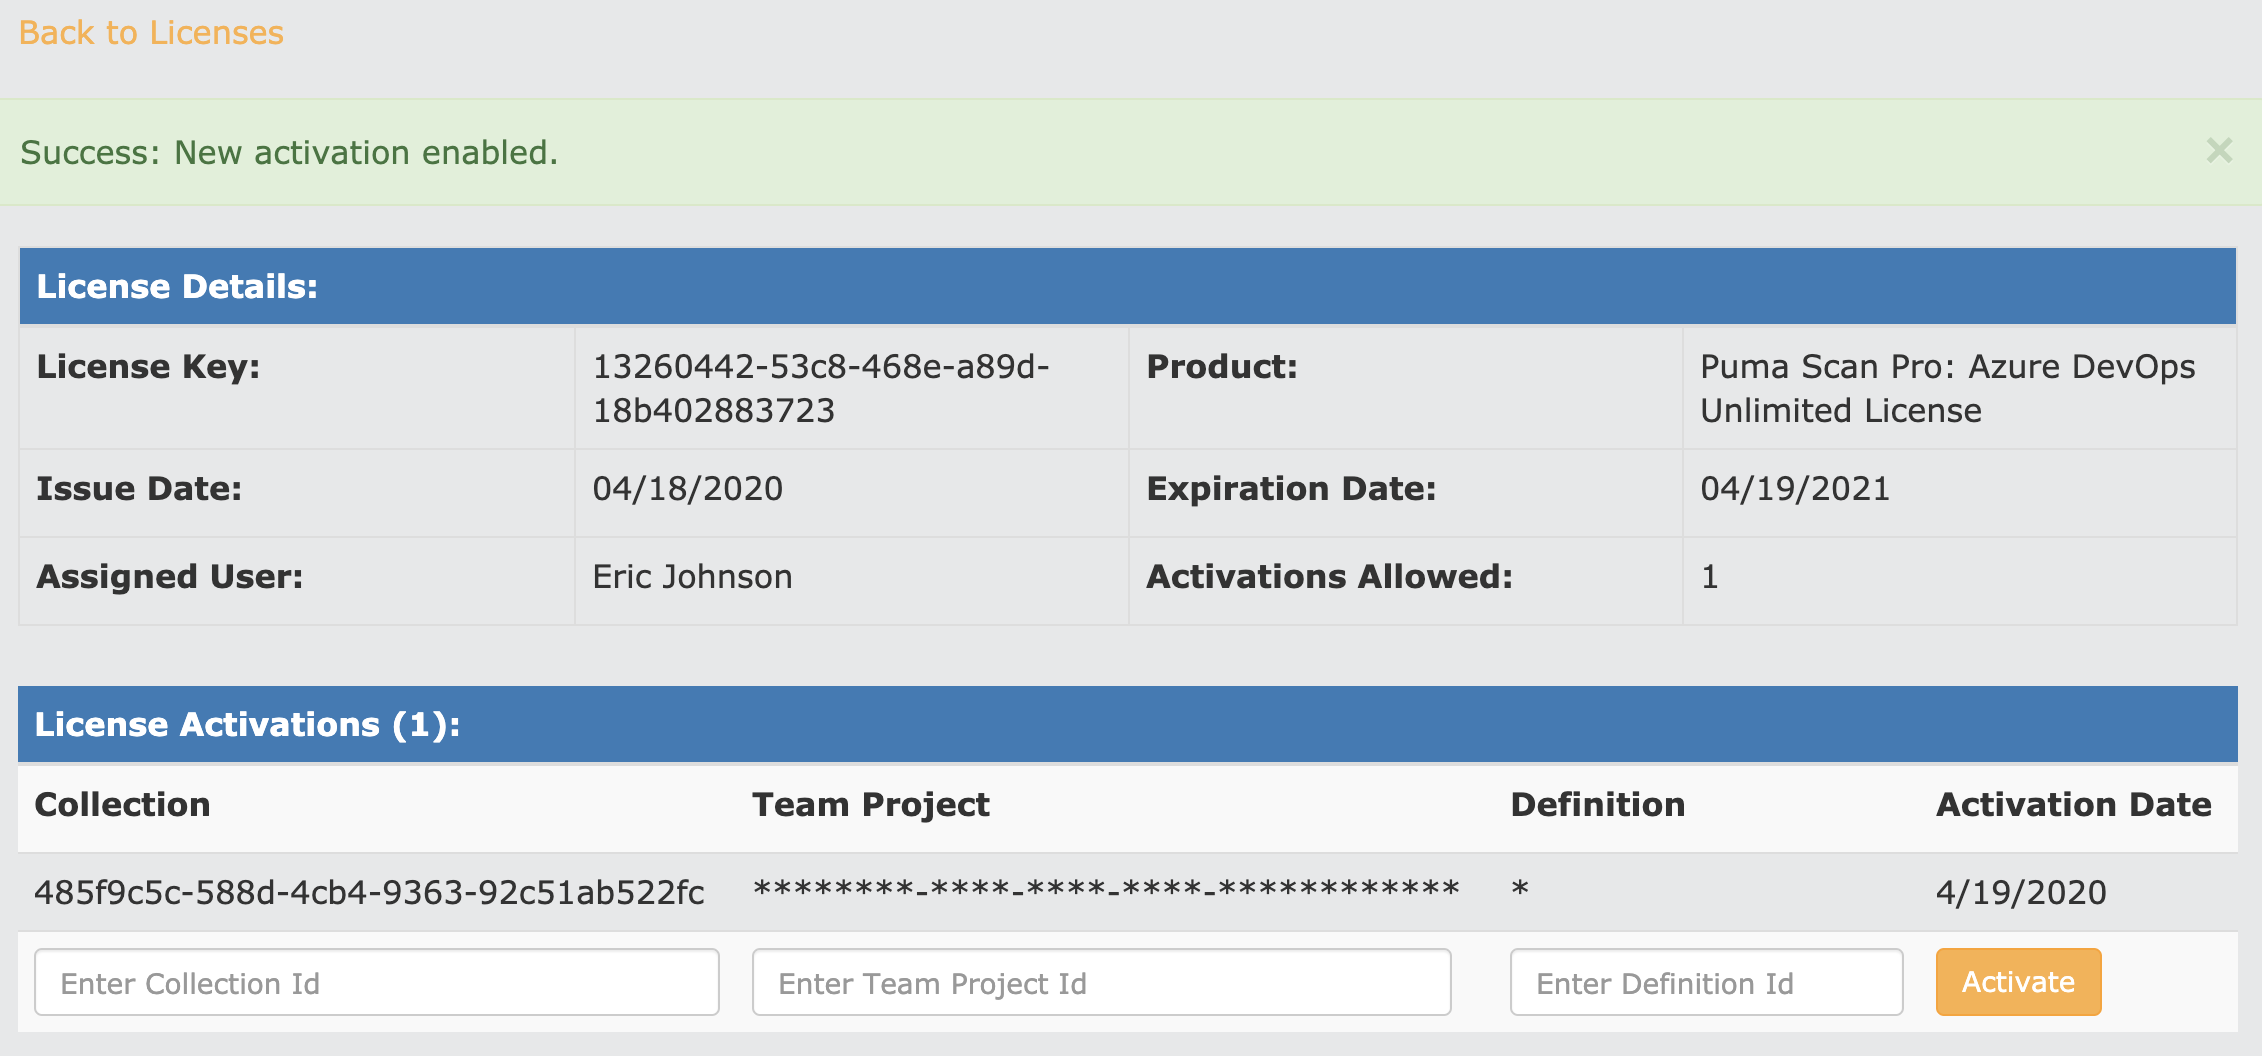
Confirm that your organization (collection id) has been successfully saved. The license is now active for all pipelines within the organization.
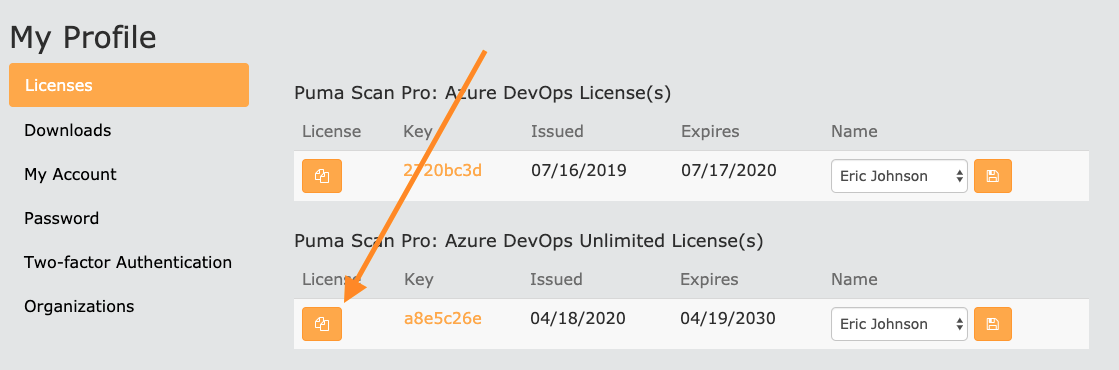
Press the Back to Licenses link and copy your Azure DevOps Unlimited license information to the clipboard by pressing the Copy button.
Back in Azure DevOps, select the pipeline you would like to add the Puma Scan build task to and create a new Build Pipeline variable called PumaLicense:
Set the value of the variable name to PumaLicense.
Paste the Puma Scan Azure DevOps Unlimited license into the Value field.
Press the lock icon to protect the secret value.
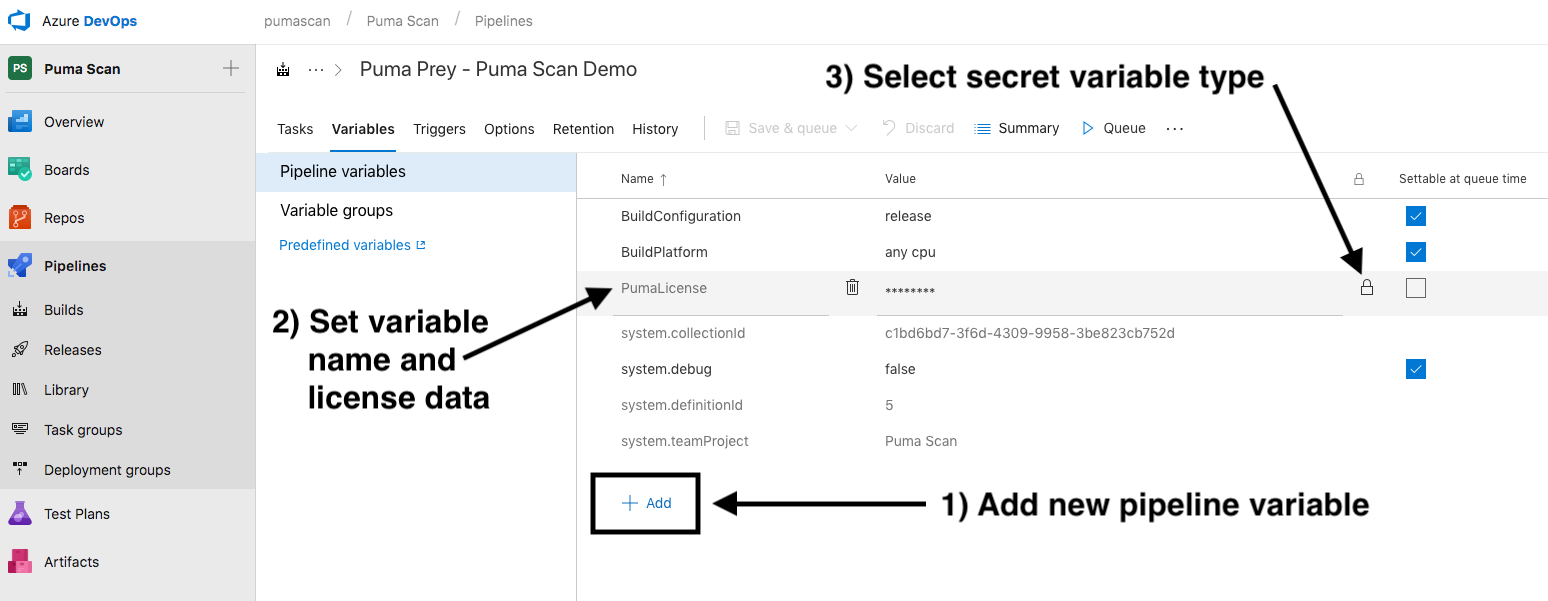
Save the pipeline definition and start Configuring the Puma Scan Build Task.
Azure DevOps Standard Licenses allow up to twenty (20) activations. Each pipeline must be individually activated using the organization id (collection id), project (team project id), and pipeline definition (definition id). To activate a new pipeline, follow these steps.
Sign In to pumascan.com and copy the Azure DevOps Standard license information to the clipboard by pressing the Copy button.

Back in Azure DevOps, select the pipeline you would like to add the Puma Scan build task to and create a new Build Pipeline variable called PumaLicense:
Set the value of the variable name to PumaLicense.
Paste the Puma Scan Azure DevOps Standard license into the Value field.
Press the lock icon to protect the secret value.
Configure the Puma Scan Build Task for the pipeline and queue the pipeline. Resume these instructions when the build task fails the first time.
Pipelines are automatically activated during the first execution if the license is missing the current pipeline’s activation data. For this reason, the first pipeline execution will fail; however, the Puma Scan build task will return the newly activated license details.

Find the new license details by viewing the Puma Scan Professional build logs. Find the following message in the console output and copy the new the license data JSON (including the curly braces) onto the clipboard.
  ERROR: Puma Scan license is invalid.
  This Azure DevOps pipeline is not in the approved activations list. Puma Scan has automatically activated this pipeline. To fix this error, please update the license pipeline variable to the following value:
  {'LicenseData':'...','Signature':'...'}
Edit the build pipeline and update the PumaLicense pipeline variable with the new license data.
Find the PumaLicense variable and press the lock icon to unlock the value.
Paste the your Puma Scan Azure DevOps license data (copied to the clipboard from the build logs above)into the Value field.

Press the lock icon to protect the new secret value and save the pipeline.
Queue the pipeline again and verify the Puma Scan build task completes successfully.
Alternatively, you can manually activate multiple pipelines at once using the organization id (collection id), project (team project id), and pipeline definition (definition id).
The collection id and definition id are visible in the default pipeline variables.
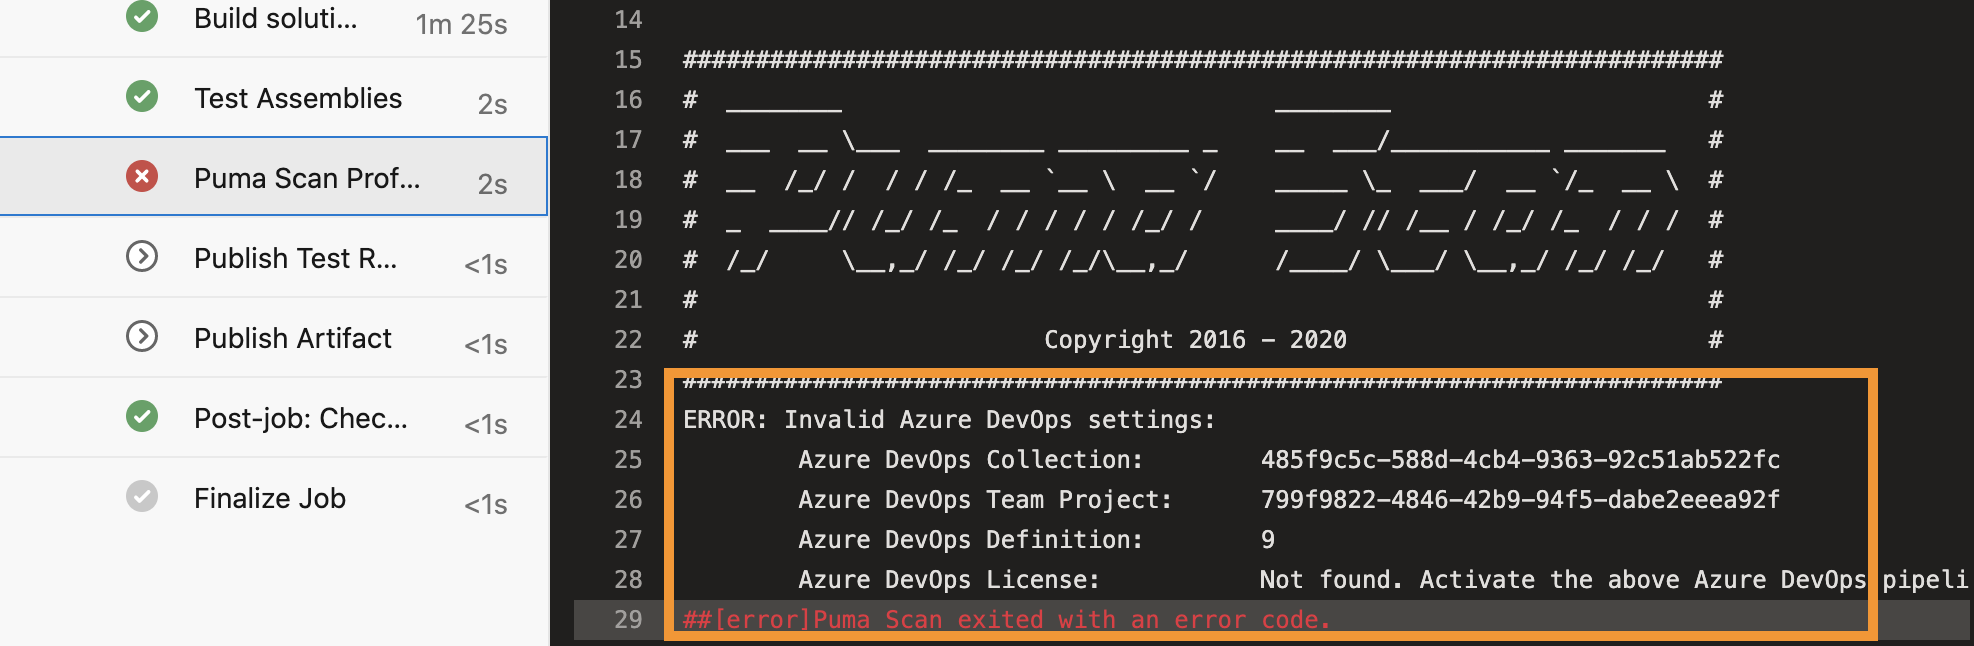
The team project id cannot be found in the web interface. The easiest way to find this is by running the extension without the PumaLicense value set. Configure the Puma Scan Build Task are return to this step when the pipeline fails.
Find the error message below in the Puma Scan Professional build logs. Copy the collection, team project, and definition onto the clipboard.
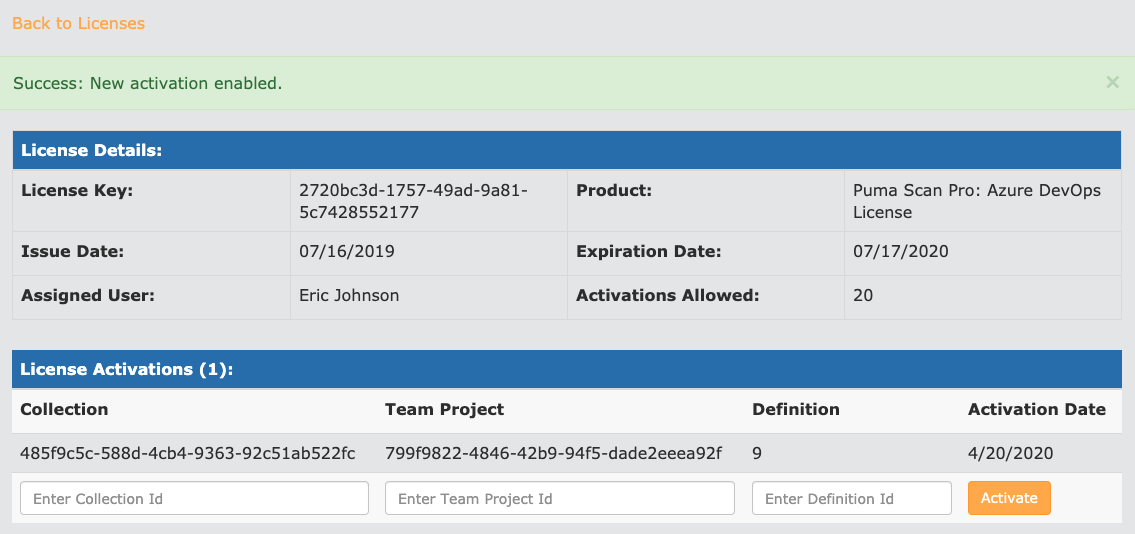
Back in the browser, view the license details for your Azure DevOps Standard license.
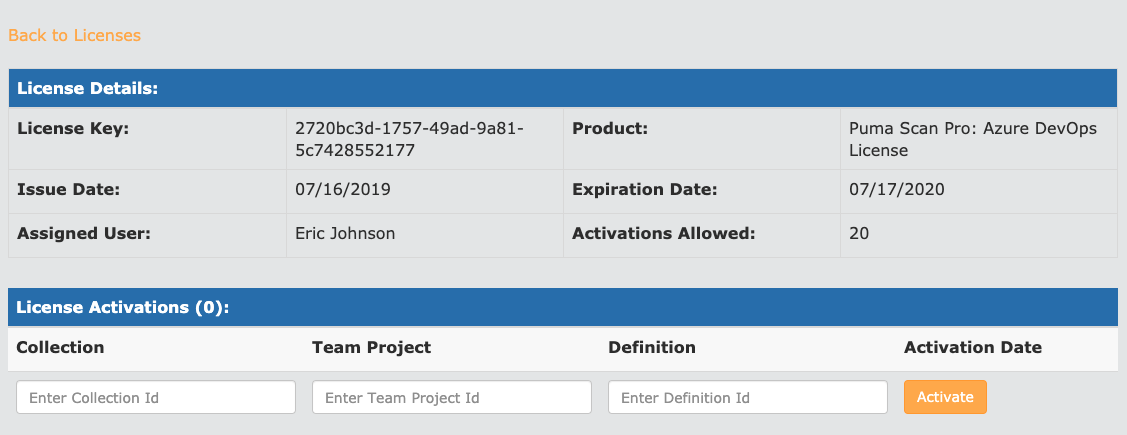
Enter the Collection, Team Project, and Definition id values and press the “Activate” button.
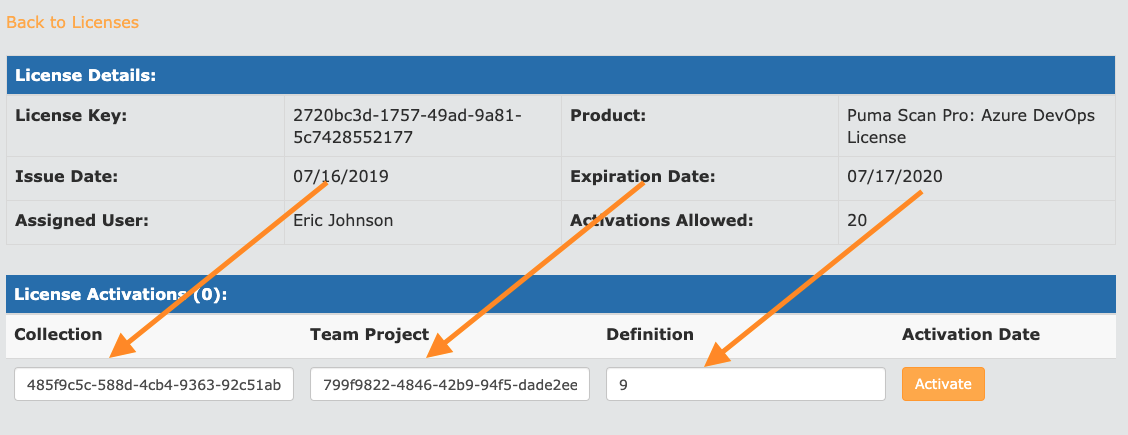
Confirm that your activation has been successfully saved. The license is now active for the individual pipeline.
Repeat the process for any additional pipelines you would like to activate.
Copy your Azure DevOps Standard license information to the clipboard by pressing the Copy button.
Back in Azure DevOps, add a new Build Pipeline variable called PumaLicense:
Set the value of the variable name to PumaLicense.
Paste the Puma Scan Azure DevOps Standard license into the Value field.
Press the lock icon to protect the secret value.
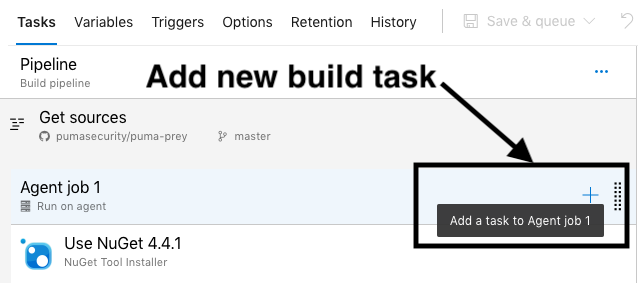
For each Build Pipeline, configure the Puma Scan Professional Build task after you have restored and built the solution or project. Then, following these steps:
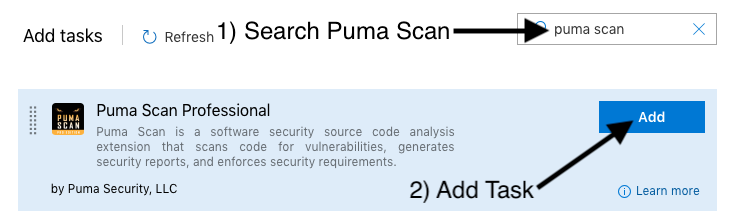
Add a new Puma Scan Professional build task to the pipeline.
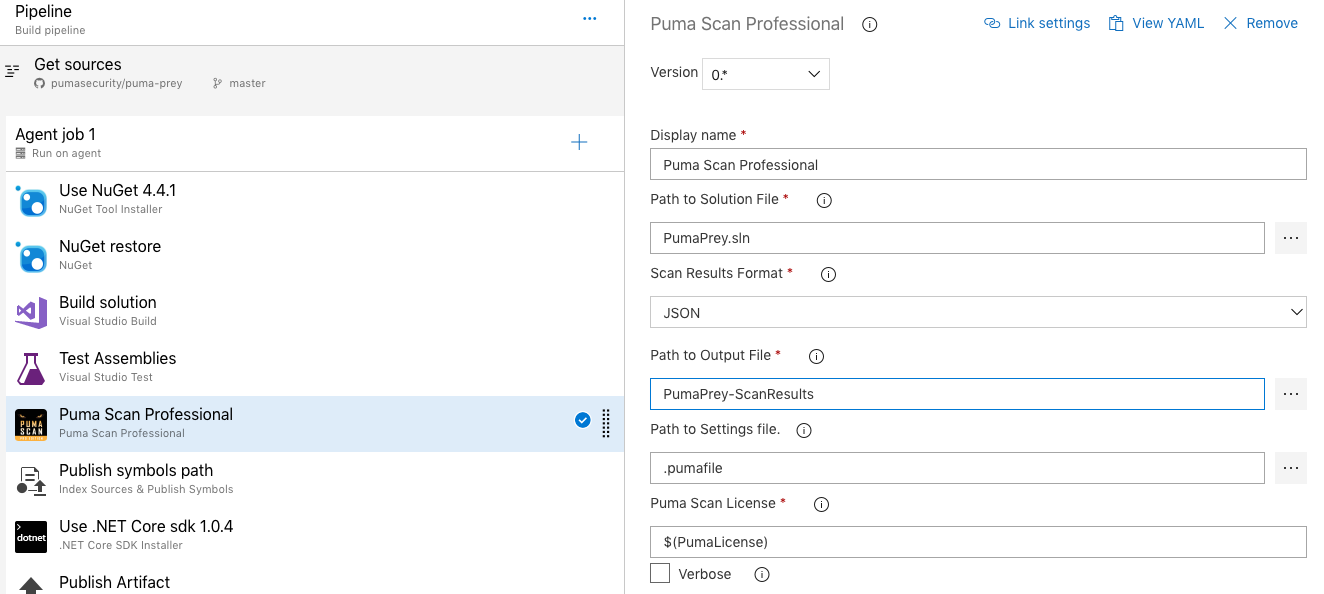
Select and configure the Puma Scan Professional Build Task by setting the following values.
Path to Solution File: Relative path to the solution or project file to scan.
Path to Settings file: Relative path to the .pumafile (settings file) in the source control repository. This file includes the scanner configuration, custom sources, cleanse methods, and exceptions for the given application.
Puma Scan License: Reference the name of the pipeline variable containing your license information. If you followed the instructions above, this value should be $(PumaLicense). See the Activate Azure DevOps License for more details on configuring the license.
Scan Results Format: Select one or more output result formats. Options include HTML, JSON, CSV, MSTest, MSBuild.
Path to Output File: Relative path and base name of the output files. The extension will be automatically added based on the formats selected above.
Verbose: Tells the scanner to write verbose output to the console when the build task runs.
Threshold High: Sets a threshold on the allowable number of high risk results before the build task fails. For example, setting the value to 10 would stop the build if more than 10 high risk scan results are found during analysis.
Threshold Medium: Sets a threshold on the allowable number of medium risk results before the build task fails. For example, setting the value to 10 would stop the build if more than 10 medium risk scan results are found during analysis.
Threshold Low: Sets a threshold on the allowable number of low risk results before the build task fails. For example, setting the value to 10 would stop the build if more than 10 low risk scan results are found during analysis.
Execute the build pipeline and wait for the tasks to finish.
Review the build logs and ensure the Puma Scan Professional task successfully completed.
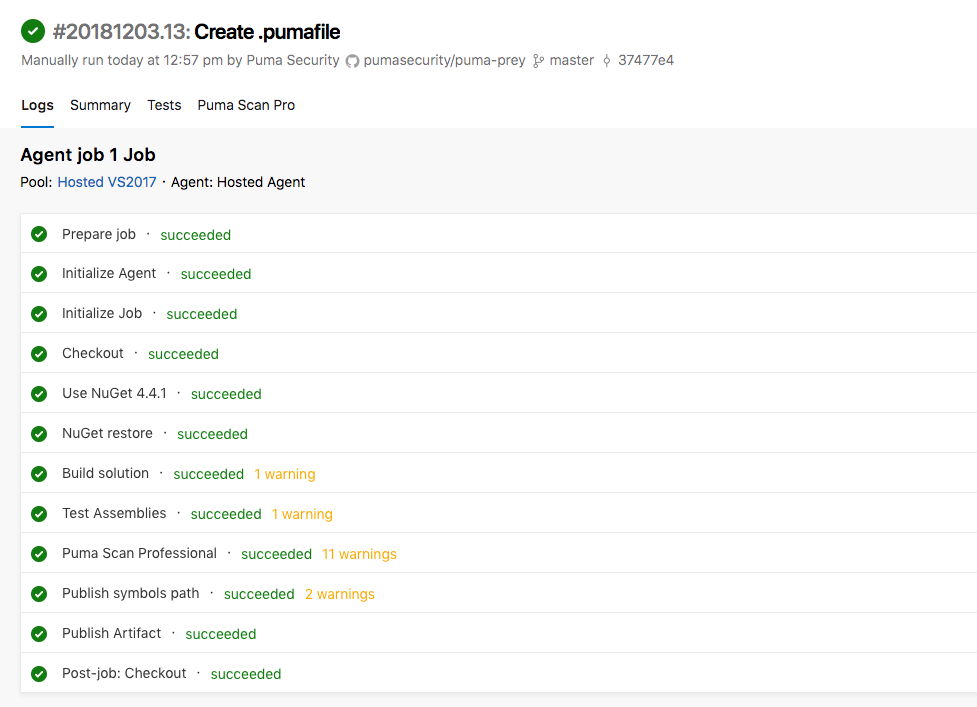
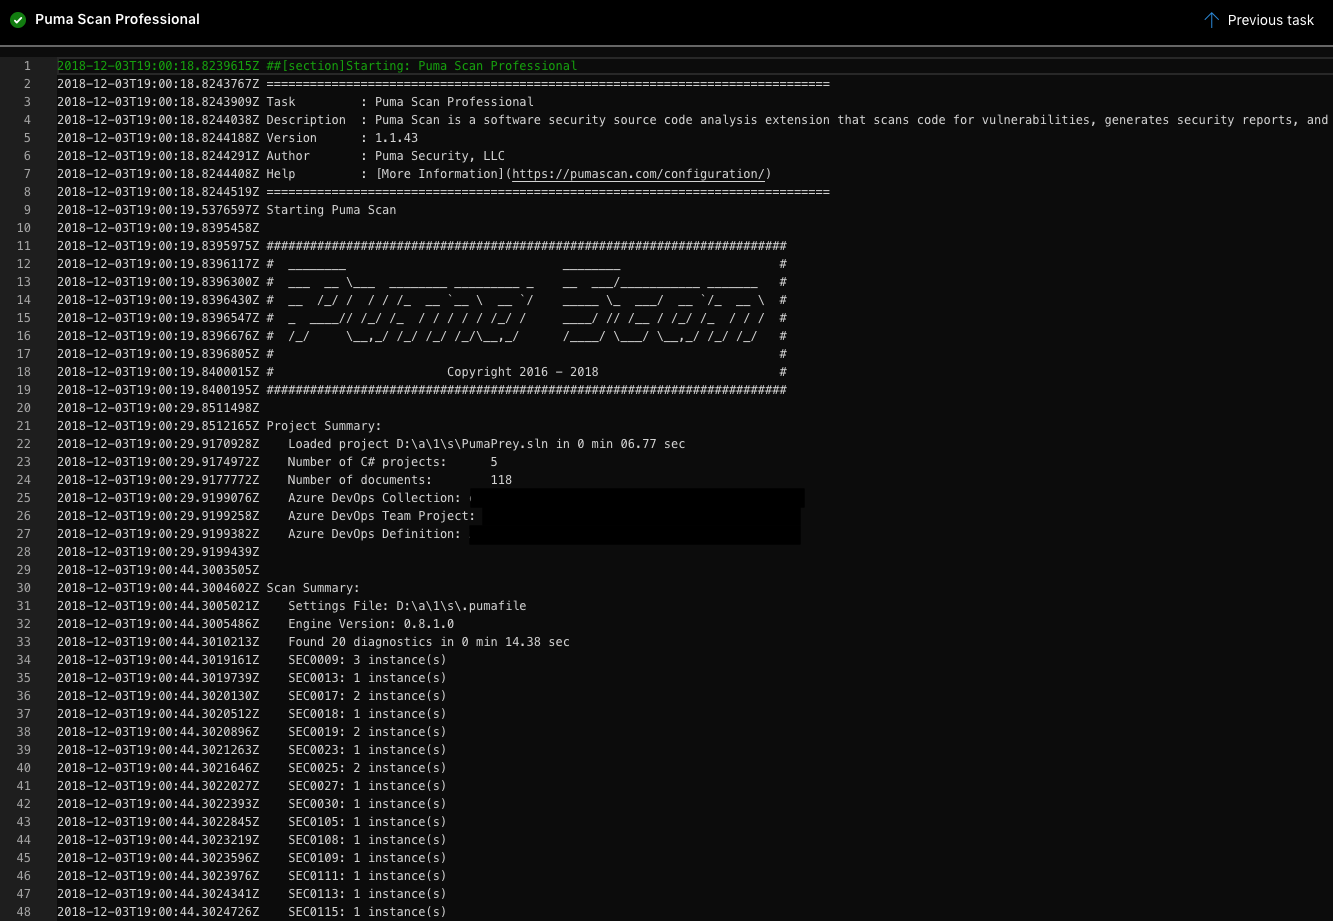
Click on the Puma Scan Professional task to view the build output.
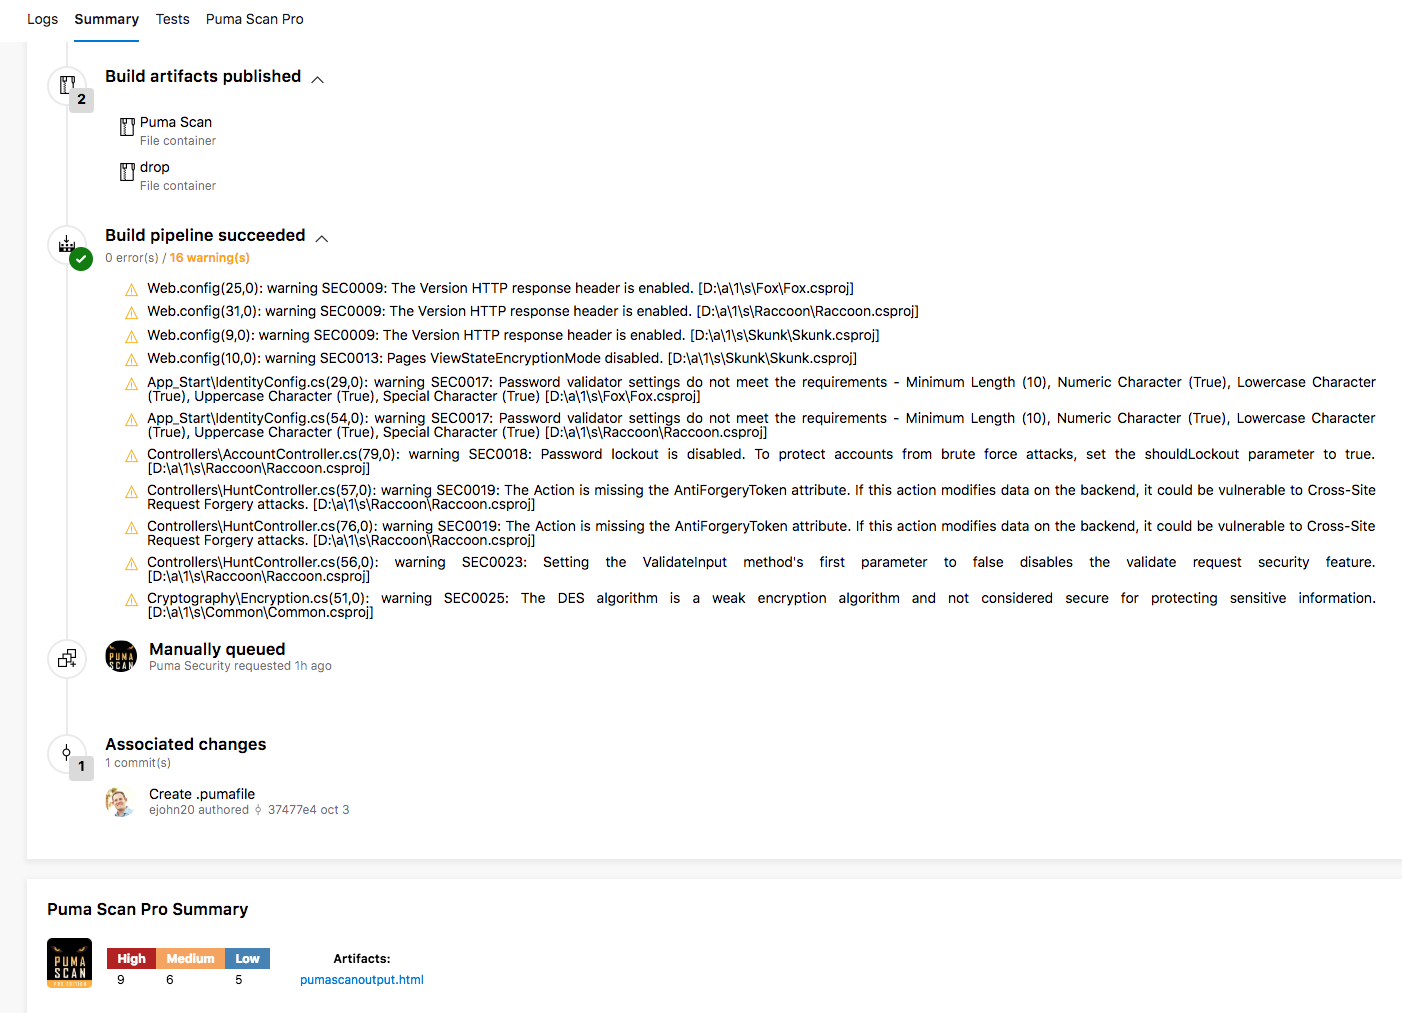
View the build pipeline Summary tab to view the artifacts, warnings, and Puma Scan Pro summary.
View the build pipeline Puma Scan Pro tab to view the detailed scan results.

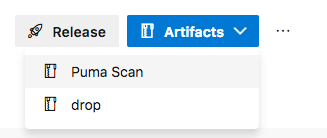
Download the Puma Scan vulnerability reports using the build Artifacts dropdown list.
View the User Guide to start scanning!
